> ## Documentation Index
> Fetch the complete documentation index at: https://docs.nscale.com/llms.txt
> Use this file to discover all available pages before exploring further.
# Environments
> Reuse your GPUs across multiple environments, such as dev, staging, and prod, and deploy AI models into each one.
**Reuse your GPUs across multiple environments.** You reserve GPU capacity once, as an environment cluster. Several environments, such as `dev` and `staging`, can then share that capacity. You deploy AI models into each environment, and each deployment has an OpenAI-compatible endpoint.
**Beta:** Environments is in beta for **private cloud** organizations. To join the waitlist, contact [support](mailto:helpdesk@nscale.com).
## What you get
* **Shared GPUs.** Several environments can use the same cluster.
* **Network isolation.** Each environment has its own network rules. By default, environments can't reach each other over the network. Environments on the same cluster share its GPUs, so their compute isn't isolated. To give an environment its own GPUs, put it on its own cluster.
* **Model deployment from the console.** Select a model, an environment, and a profile. The console creates an OpenAI-compatible endpoint.
* **Managed setup.** Nscale installs the GPU drivers, the model runtime, and the public gateway.
## The three parts
There are three things to know. You create them in this order.
| Part | What it is |
| - | - |
| **Environment cluster** | GPU capacity you reserve in one region. Nscale manages it. |
| **Environment** | A named, network-isolated space that runs on a cluster. For example, `dev` or `prod`. |
| **Deployment** | Something you run inside an environment, such as a model with its own endpoint. |
**How they connect:**
* One cluster can hold **many** environments.
* One environment can hold **many** deployments.
* A deployment always lives in **one** environment.
* Deploying a model from the console sets up two things in the environment: the model, which serves the endpoint, and a secret that stores its access key. The console lists them together as one deployment.
## Before you start
Check that you have:
* A [project](/docs/manage/projects)
* A [VPC](/docs/network/vpc-networks) in the region you want
* Enough **GPU quota** for the cluster you want, or a [reservation](/docs/compute/reservations) with available hosts if you plan to use bare-metal node types
* The right **permissions**. Creating clusters needs an organization-level role. Ask your organization owner if a button is missing. The console hides buttons you can't use.
## Get started
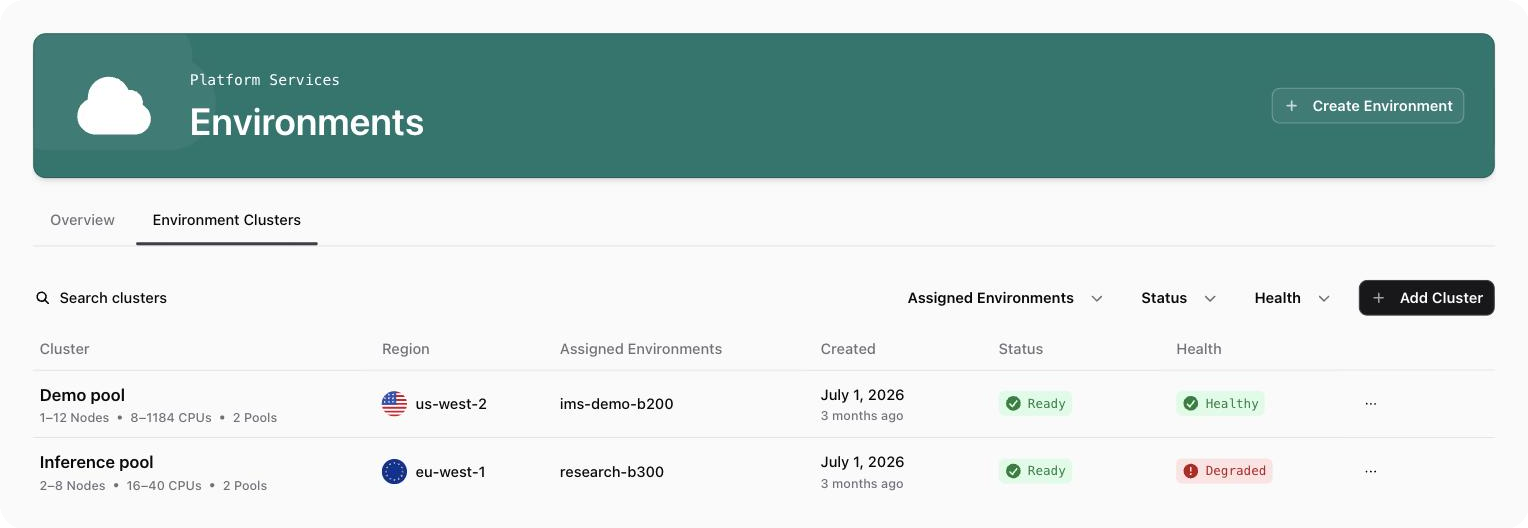
In the console, open your project and go to **Platform Services → Environments**. The page has two tabs:
* **Overview**: your environments
* **Environment Clusters**: the clusters your environments run on
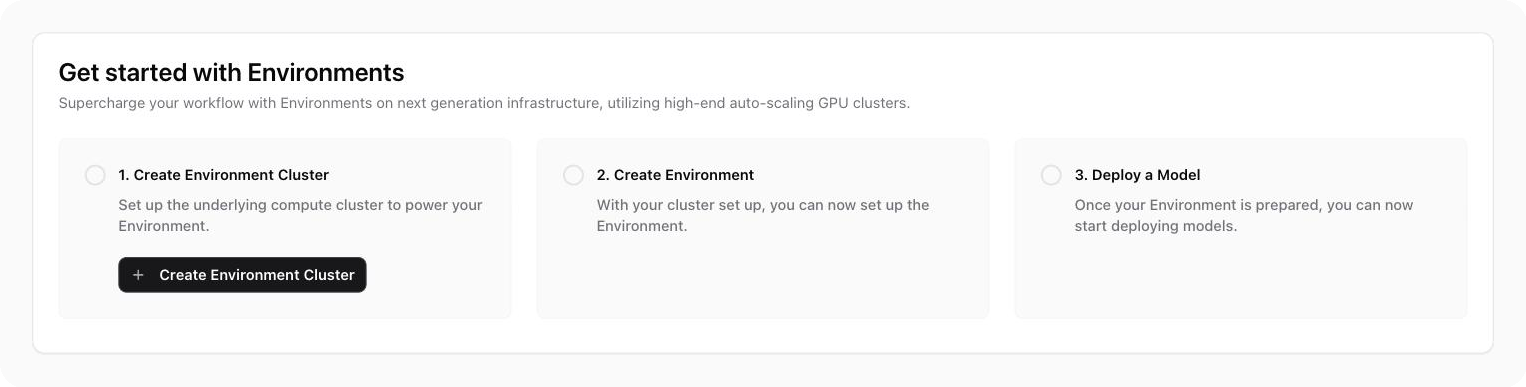
When you open it for the first time, a **Get started with Environments** checklist walks you through three steps:
1. [Create an environment cluster](#create-an-environment-cluster). Provisioning takes up to 90 minutes.
2. [Create an environment](#create-an-environment) on the cluster.
3. [Deploy a model](/docs/dedicated-models/deploy-a-model) into the environment, from **AI Services → Models**.
 ## Environment clusters
An **environment cluster** is a set of GPU nodes in one region, dedicated to your workloads. Nscale places the nodes to optimize the network topology between them. Your environments and models run on it.
Nscale runs the cluster as a managed inference service. Nscale provisions, operates, and updates the nodes, the network, the GPU drivers, and the gateway that serves your model endpoints.
### What a cluster does
* **Runs your environments.** Every environment runs on a cluster. One cluster can run many environments.
* **Dedicated.** No other customer runs on it.
* **Your choice of hardware.** You pick the VPC, which sets the region, and the node types.
### Cluster terms
| Word | Meaning |
| - | - |
| **Regional VPC** | The [VPC](/docs/network/vpc-networks) the cluster runs in. The VPC sets the cluster's region, and the region decides which node types you can pick. **You can't change it later.** |
| **Node type** | The kind of node. For example, how many GPUs, how much VRAM, CPU, and RAM. |
| **Node pool** | A group of identical nodes with one node type. A cluster has one or more pools. |
| **Reservation** | Bare-metal (**BM**) capacity reserved for your organization. A pool with a BM node type takes its hosts from a [reservation](/docs/compute/reservations). |
### Create an environment cluster
You need an **organization-level** role to create clusters. If you can't see the button, ask your organization owner.
Go to **Platform Services → Environments** and open the **Environment Clusters** tab.
Click **Create Environment Cluster**. If you already have clusters, click **+ Add Cluster** above the table.
## Environment clusters
An **environment cluster** is a set of GPU nodes in one region, dedicated to your workloads. Nscale places the nodes to optimize the network topology between them. Your environments and models run on it.
Nscale runs the cluster as a managed inference service. Nscale provisions, operates, and updates the nodes, the network, the GPU drivers, and the gateway that serves your model endpoints.
### What a cluster does
* **Runs your environments.** Every environment runs on a cluster. One cluster can run many environments.
* **Dedicated.** No other customer runs on it.
* **Your choice of hardware.** You pick the VPC, which sets the region, and the node types.
### Cluster terms
| Word | Meaning |
| - | - |
| **Regional VPC** | The [VPC](/docs/network/vpc-networks) the cluster runs in. The VPC sets the cluster's region, and the region decides which node types you can pick. **You can't change it later.** |
| **Node type** | The kind of node. For example, how many GPUs, how much VRAM, CPU, and RAM. |
| **Node pool** | A group of identical nodes with one node type. A cluster has one or more pools. |
| **Reservation** | Bare-metal (**BM**) capacity reserved for your organization. A pool with a BM node type takes its hosts from a [reservation](/docs/compute/reservations). |
### Create an environment cluster
You need an **organization-level** role to create clusters. If you can't see the button, ask your organization owner.
Go to **Platform Services → Environments** and open the **Environment Clusters** tab.
Click **Create Environment Cluster**. If you already have clusters, click **+ Add Cluster** above the table.
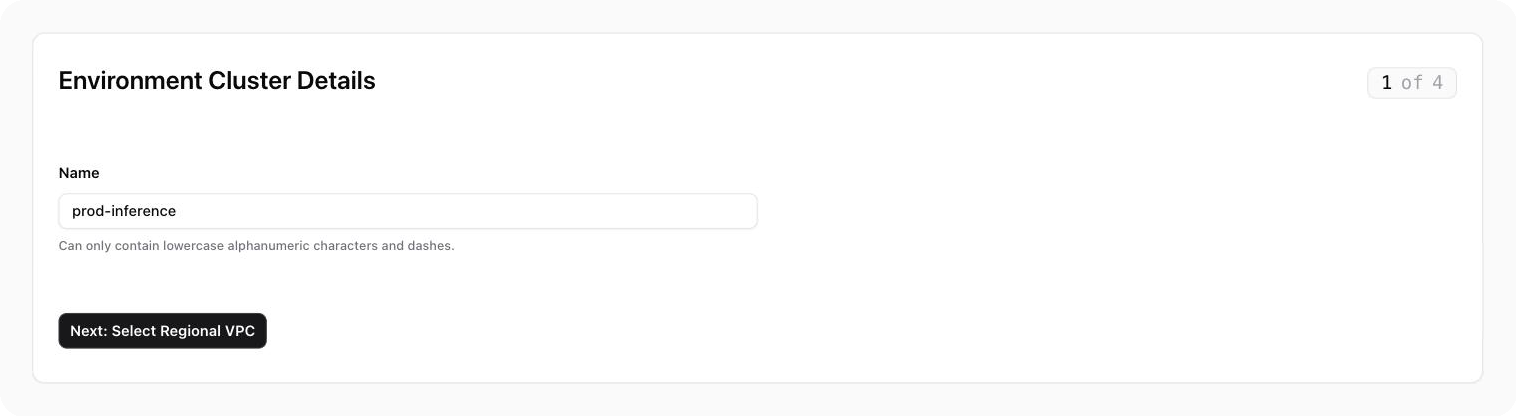
 Under **Environment Cluster Details**, enter a **Name**.
Name rules:
* 3 to 49 characters
* Lowercase letters, numbers, and dashes only
* Start and end with a letter or number
* Can't contain `nscale`
* Must be unique in the project
Under **Environment Cluster Details**, enter a **Name**.
Name rules:
* 3 to 49 characters
* Lowercase letters, numbers, and dashes only
* Start and end with a letter or number
* Can't contain `nscale`
* Must be unique in the project
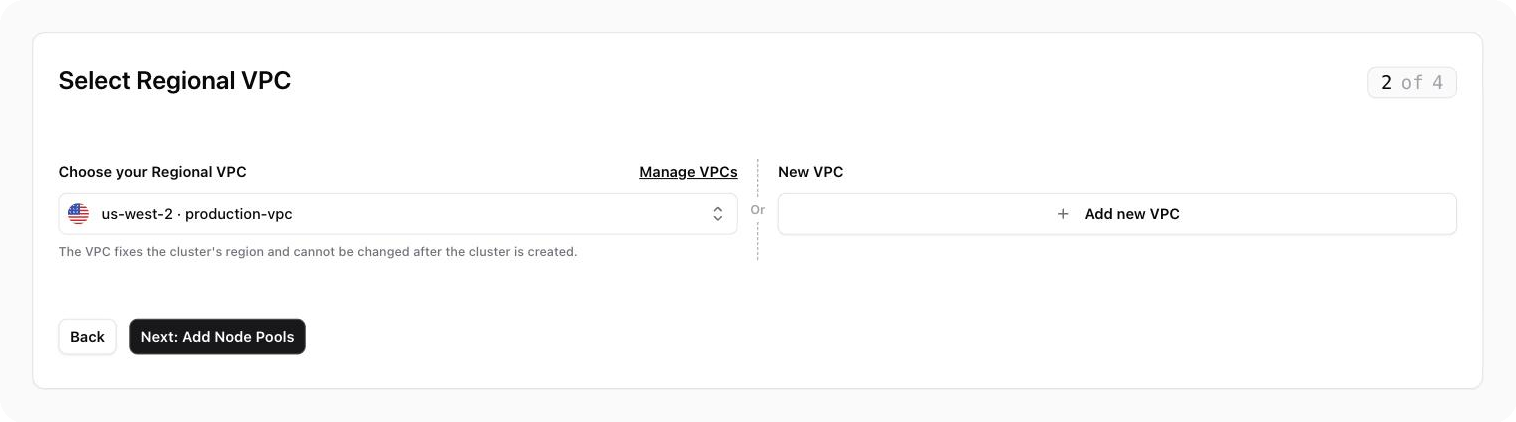
 Under **Select Regional VPC**, pick a VPC from **Choose your Regional VPC**. Each VPC shows its region. To create a VPC, click **+ Add new VPC**.
**You can't change the VPC later.** The VPC sets the cluster's region, and the region decides which node types you can use.
Under **Select Regional VPC**, pick a VPC from **Choose your Regional VPC**. Each VPC shows its region. To create a VPC, click **+ Add new VPC**.
**You can't change the VPC later.** The VPC sets the cluster's region, and the region decides which node types you can use.
 Under **Add Node Pools**, set up at least one pool:
* **Pool Name**: same rules as the cluster name. Must be unique in the cluster.
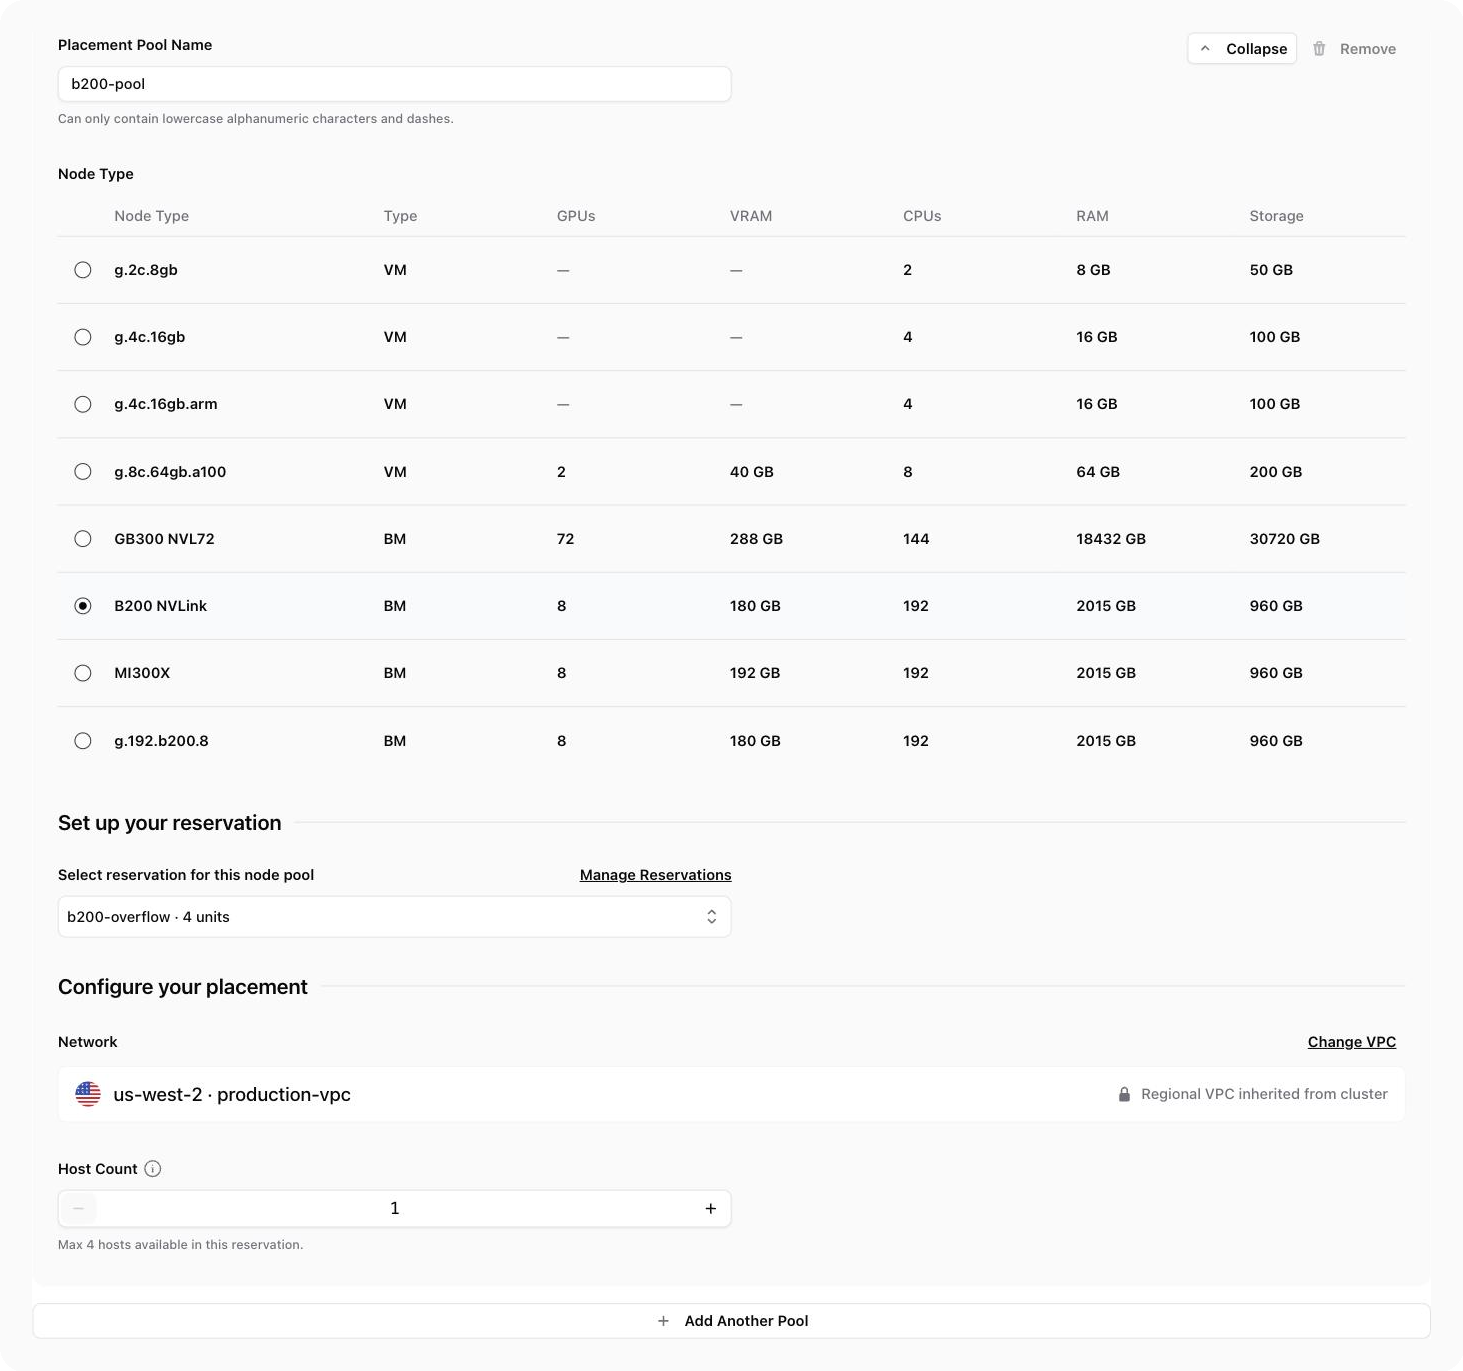
* **Node Type**: pick a node type from the table. Check the **GPUs** and **VRAM** columns. The **Type** column shows **VM** or **BM** (bare metal).
The remaining fields depend on the node type:
* **VM node type**: under **Configure your Pool**, set the **Number of Replicas**.
* **BM node type**: the field label changes to **Placement Pool Name**. Under **Set up your reservation**, select the reservation to take hosts from. Under **Configure your placement**, set the **Host Count**. The maximum is the number of hosts available in the reservation. The pool uses the cluster's VPC.
To add more pools, click **+ Add Another Pool**.
Pick the node type with care. **You can't change it after the cluster is created.** Choose hardware that fits the models you plan to run.
Under **Add Node Pools**, set up at least one pool:
* **Pool Name**: same rules as the cluster name. Must be unique in the cluster.
* **Node Type**: pick a node type from the table. Check the **GPUs** and **VRAM** columns. The **Type** column shows **VM** or **BM** (bare metal).
The remaining fields depend on the node type:
* **VM node type**: under **Configure your Pool**, set the **Number of Replicas**.
* **BM node type**: the field label changes to **Placement Pool Name**. Under **Set up your reservation**, select the reservation to take hosts from. Under **Configure your placement**, set the **Host Count**. The maximum is the number of hosts available in the reservation. The pool uses the cluster's VPC.
To add more pools, click **+ Add Another Pool**.
Pick the node type with care. **You can't change it after the cluster is created.** Choose hardware that fits the models you plan to run.
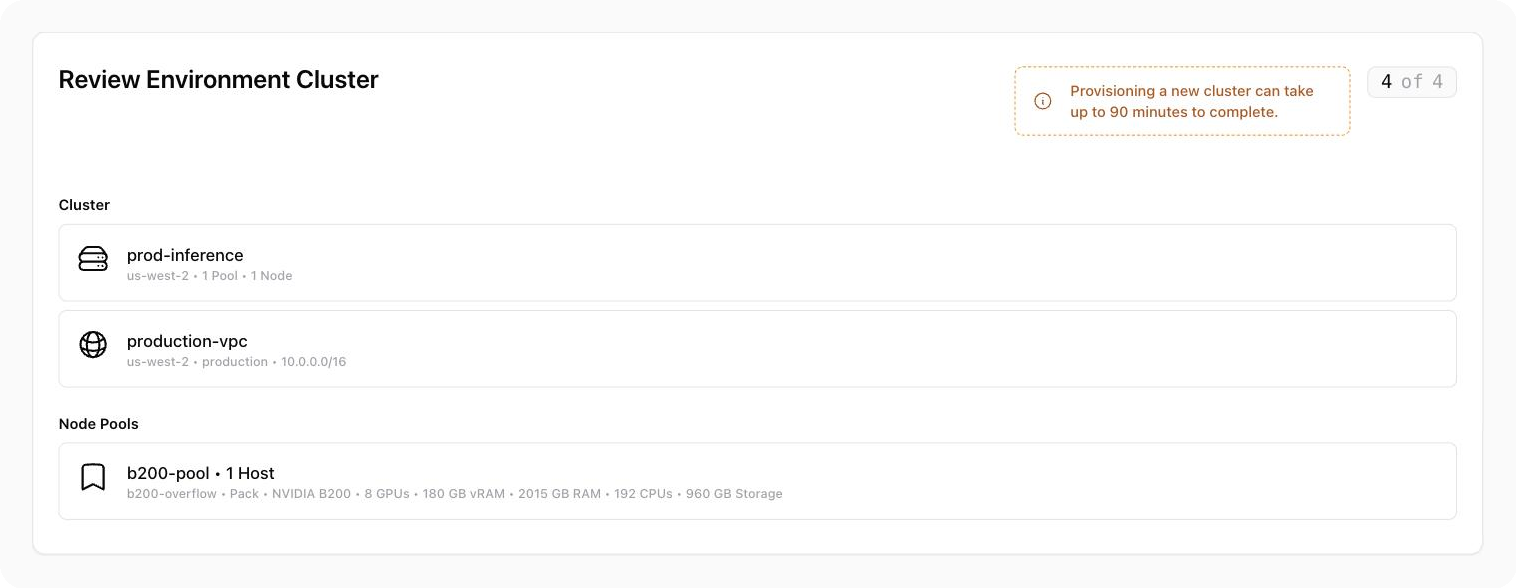
 Under **Review Environment Cluster**, check the cluster, VPC, and node pool summary.
If the pools go over your GPU quota, the review shows a message and you can't create the cluster. Remove a pool or lower its node or host count.
Click **Create Environment Cluster**.
Under **Review Environment Cluster**, check the cluster, VPC, and node pool summary.
If the pools go over your GPU quota, the review shows a message and you can't create the cluster. Remove a pool or lower its node or host count.
Click **Create Environment Cluster**.
 **What happens next:** The console takes you back to the **Environment Clusters** tab. Your cluster shows **Provisioning**.
**Provisioning can take up to 90 minutes.** You can leave the page. When the status shows **Ready**, you can [create an environment](#create-an-environment) on it.
### Cluster status
| Status | What it means | What to do |
| - | - | - |
| **Provisioning** | Nscale is building the cluster | Wait. This can take up to 90 minutes |
| **Ready** | The cluster is ready to use | Create an environment |
| **Updating** | A change is being applied | Wait |
| **Deleting** | The cluster is being removed | Wait |
| **Error** | The cluster couldn't be built | Delete it and create a new one. There is no retry |
The **Health** column shows if a ready cluster is working well: **Healthy**, **Degraded**, **Unhealthy**, or **Unknown**.
### View a cluster
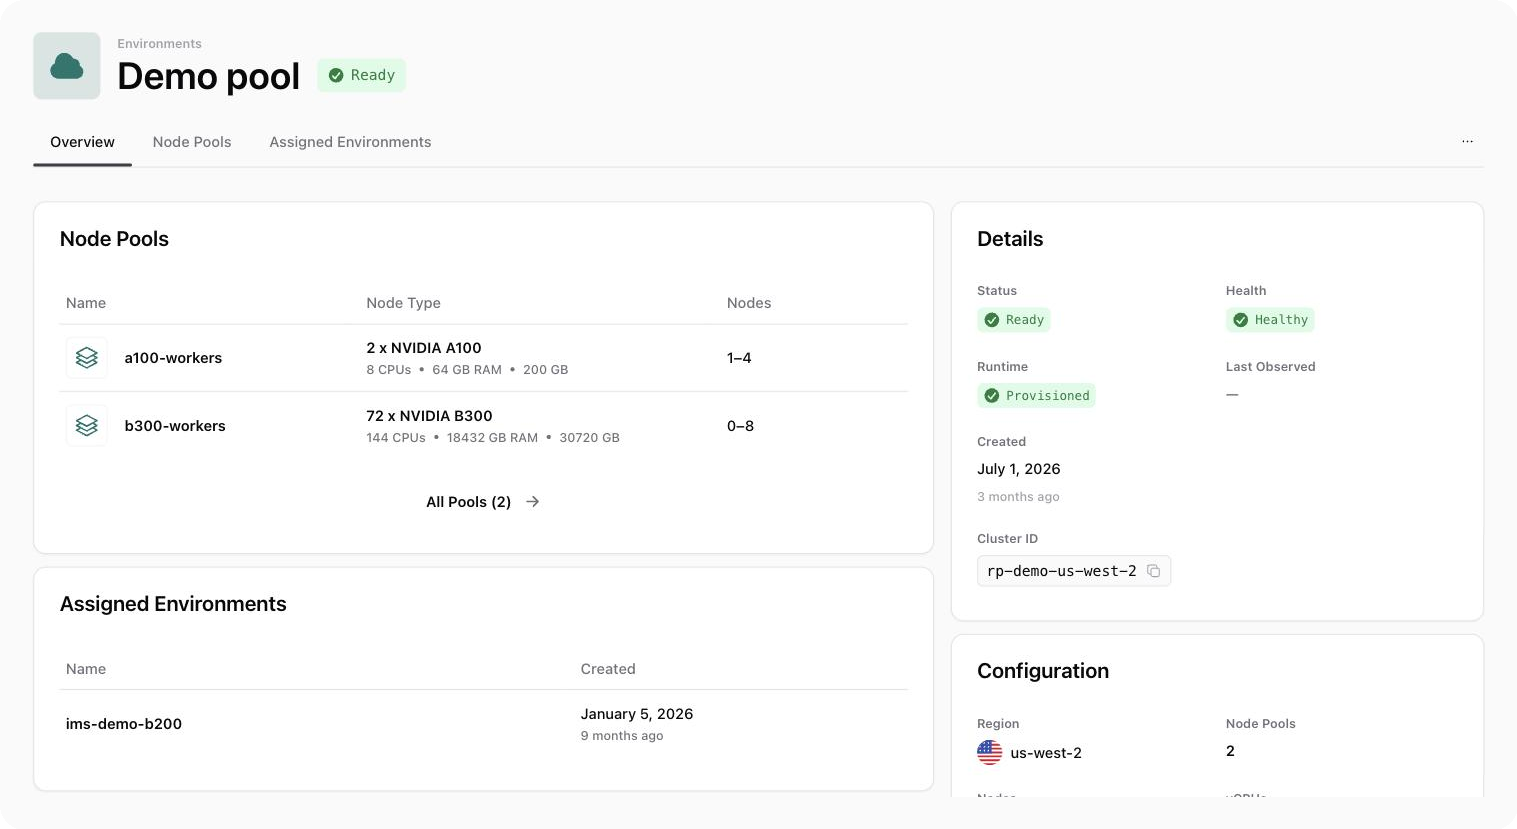
Click a cluster in the list to open it. You'll see three tabs:
* **Overview**: node pools, assigned environments, status, health, cluster ID, and region
* **Node Pools**: each pool, its node type, and node count
* **Assigned Environments**: environments that run on this cluster
**What happens next:** The console takes you back to the **Environment Clusters** tab. Your cluster shows **Provisioning**.
**Provisioning can take up to 90 minutes.** You can leave the page. When the status shows **Ready**, you can [create an environment](#create-an-environment) on it.
### Cluster status
| Status | What it means | What to do |
| - | - | - |
| **Provisioning** | Nscale is building the cluster | Wait. This can take up to 90 minutes |
| **Ready** | The cluster is ready to use | Create an environment |
| **Updating** | A change is being applied | Wait |
| **Deleting** | The cluster is being removed | Wait |
| **Error** | The cluster couldn't be built | Delete it and create a new one. There is no retry |
The **Health** column shows if a ready cluster is working well: **Healthy**, **Degraded**, **Unhealthy**, or **Unknown**.
### View a cluster
Click a cluster in the list to open it. You'll see three tabs:
* **Overview**: node pools, assigned environments, status, health, cluster ID, and region
* **Node Pools**: each pool, its node type, and node count
* **Assigned Environments**: environments that run on this cluster
 You can't edit a cluster or add pools after it is created. To change the hardware, create a new cluster.
### Cancel a cluster that is still provisioning
If you made a mistake, you can stop it.
1. In the cluster list, click **⋯** on the cluster.
2. Click **Cancel Current Request**.
3. Click **Cancel request** to confirm.
Any work done so far is lost. If you try again, it starts from the beginning.
### Delete an environment cluster
**Deleting a cluster is permanent.** Environments that use it lose their capacity. Any model running on it stops.
Delete every environment listed under **Assigned Environments**. See [Delete an environment](#delete-an-environment).
In the cluster list, click **⋯** on the cluster, then click **Delete Environment Cluster**.
Type the cluster name and confirm. The status changes to **Deleting**. The cluster disappears from the list when it is done.
You can't delete a cluster while a request is still running. Wait for it to finish, or cancel it first.
## Environments
An **environment** is a named, network-isolated space on an environment cluster. You deploy models into it.
For example, you can have `dev`, `staging`, and `prod` environments on the same cluster.
### What an environment does
* **Network isolation.** By default, a model in `dev` can't reach a model in `prod` over the network.
* **Grouped deletion.** Deleting an environment also deletes every deployment in it.
### Create an environment
You need an [environment cluster](#environment-clusters) with the status **Ready**.
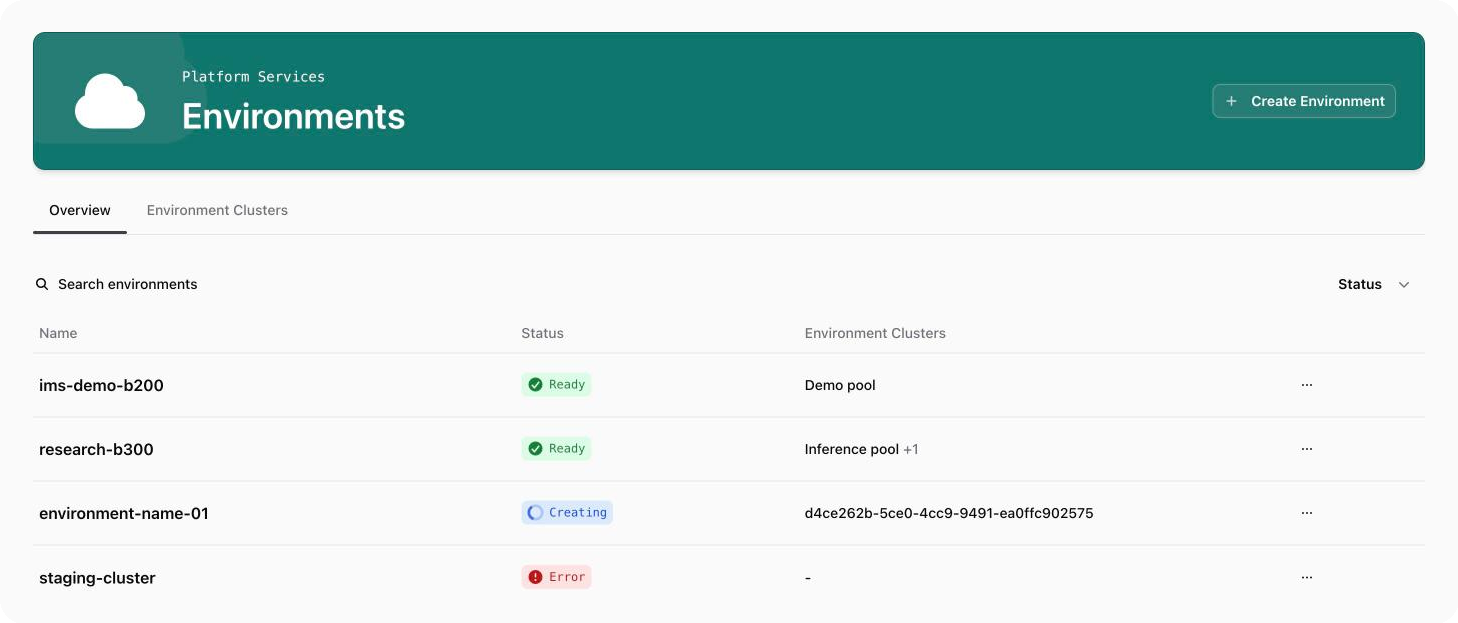
Go to **Platform Services → Environments**. Click **+ Create Environment**.
You can't edit a cluster or add pools after it is created. To change the hardware, create a new cluster.
### Cancel a cluster that is still provisioning
If you made a mistake, you can stop it.
1. In the cluster list, click **⋯** on the cluster.
2. Click **Cancel Current Request**.
3. Click **Cancel request** to confirm.
Any work done so far is lost. If you try again, it starts from the beginning.
### Delete an environment cluster
**Deleting a cluster is permanent.** Environments that use it lose their capacity. Any model running on it stops.
Delete every environment listed under **Assigned Environments**. See [Delete an environment](#delete-an-environment).
In the cluster list, click **⋯** on the cluster, then click **Delete Environment Cluster**.
Type the cluster name and confirm. The status changes to **Deleting**. The cluster disappears from the list when it is done.
You can't delete a cluster while a request is still running. Wait for it to finish, or cancel it first.
## Environments
An **environment** is a named, network-isolated space on an environment cluster. You deploy models into it.
For example, you can have `dev`, `staging`, and `prod` environments on the same cluster.
### What an environment does
* **Network isolation.** By default, a model in `dev` can't reach a model in `prod` over the network.
* **Grouped deletion.** Deleting an environment also deletes every deployment in it.
### Create an environment
You need an [environment cluster](#environment-clusters) with the status **Ready**.
Go to **Platform Services → Environments**. Click **+ Create Environment**.
 Under **Environment Details**, enter a **Name**. For example, `dev` or `prod`.
Name rules:
* Up to 62 characters
* Lowercase letters, numbers, and dashes only
* Start and end with a letter or number
* Must be unique in the project
Use a name that shows the purpose, like `dev`, `test`, or `prod`. **You can't rename it later.**
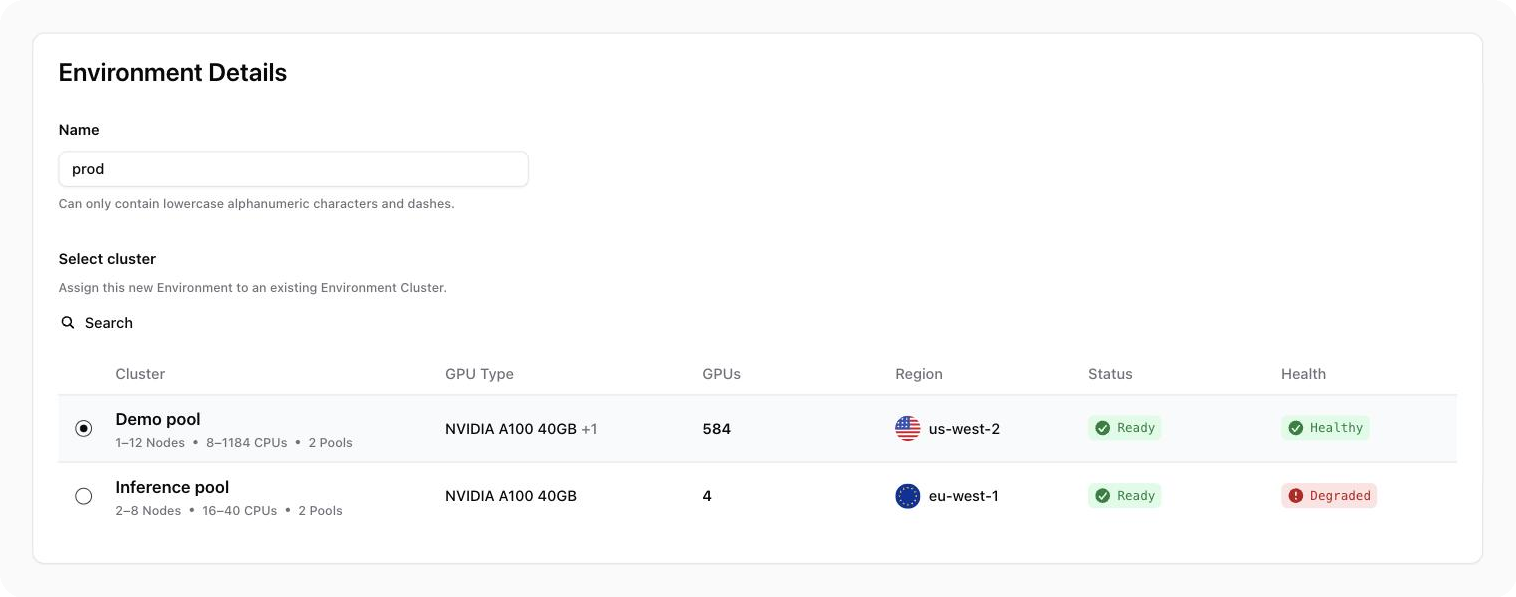
Under **Select cluster**, pick the environment cluster to run on.
The table shows each cluster's **GPU Type**, **GPUs**, **Region**, **Status**, and **Health**. Pick one that is **Ready** and has the GPUs your models need.
Under **Environment Details**, enter a **Name**. For example, `dev` or `prod`.
Name rules:
* Up to 62 characters
* Lowercase letters, numbers, and dashes only
* Start and end with a letter or number
* Must be unique in the project
Use a name that shows the purpose, like `dev`, `test`, or `prod`. **You can't rename it later.**
Under **Select cluster**, pick the environment cluster to run on.
The table shows each cluster's **GPU Type**, **GPUs**, **Region**, **Status**, and **Health**. Pick one that is **Ready** and has the GPUs your models need.
 Check the **Review your Environment** card. Click **Create Environment**.
**What happens next:** The console takes you back to the Environments list. Your environment shows **Creating**. When it shows **Ready**, you can [deploy a model](/docs/dedicated-models/deploy-a-model) into it.
### Environment status
| Status | What it means | What to do |
| - | - | - |
| **Creating** | Nscale is setting it up | Wait |
| **Ready** | Ready for models | Deploy a model |
| **Updating** | A change is being applied | Wait |
| **Deleting** | It is being removed | Wait |
| **Error** | Something went wrong | Delete it and try again. Contact [support](mailto:helpdesk@nscale.com) if it keeps failing |
You can only deploy models into a **Ready** environment.
### View an environment
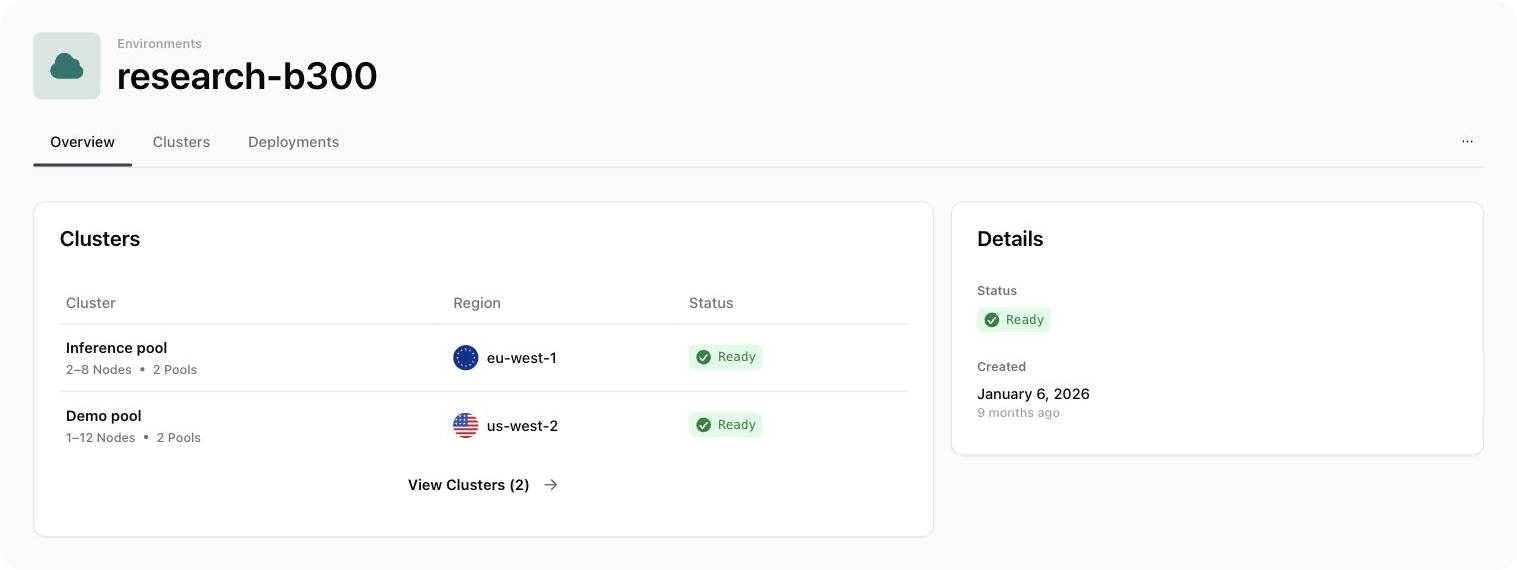
Click an environment in the list to open it. You'll see three tabs:
* **Overview**: its status, cluster, and latest deployments
* **Clusters**: the environment clusters it runs on
* **Deployments**: every deployment in it, with its service, model, profile, and status
Check the **Review your Environment** card. Click **Create Environment**.
**What happens next:** The console takes you back to the Environments list. Your environment shows **Creating**. When it shows **Ready**, you can [deploy a model](/docs/dedicated-models/deploy-a-model) into it.
### Environment status
| Status | What it means | What to do |
| - | - | - |
| **Creating** | Nscale is setting it up | Wait |
| **Ready** | Ready for models | Deploy a model |
| **Updating** | A change is being applied | Wait |
| **Deleting** | It is being removed | Wait |
| **Error** | Something went wrong | Delete it and try again. Contact [support](mailto:helpdesk@nscale.com) if it keeps failing |
You can only deploy models into a **Ready** environment.
### View an environment
Click an environment in the list to open it. You'll see three tabs:
* **Overview**: its status, cluster, and latest deployments
* **Clusters**: the environment clusters it runs on
* **Deployments**: every deployment in it, with its service, model, profile, and status
 To deploy a model from here, click **⋯** and choose **Deploy Model**.
### Delete an environment
**Deleting an environment is permanent.** Every model deployed into it is removed. Their endpoints stop working.
In the Environments list, click **⋯** on the environment. Click **Delete Environment**.
You can only delete an environment when it is **Ready** or **Error**.
Type the environment name and click **Delete**.
The status changes to **Deleting**. The environment disappears from the list when it is done.
## Next steps
Run a model in your environment and call its OpenAI-compatible endpoint.
To deploy a model from here, click **⋯** and choose **Deploy Model**.
### Delete an environment
**Deleting an environment is permanent.** Every model deployed into it is removed. Their endpoints stop working.
In the Environments list, click **⋯** on the environment. Click **Delete Environment**.
You can only delete an environment when it is **Ready** or **Error**.
Type the environment name and click **Delete**.
The status changes to **Deleting**. The environment disappears from the list when it is done.
## Next steps
Run a model in your environment and call its OpenAI-compatible endpoint.