

kubectl and helm. Your workloads run on on-demand machines or on bare-metal GPU capacity you’ve reserved.
Before you start, you need:
- A project and a VPC network in the region you want the cluster in.
- A provisioned reservation with free hosts, if you want NVIDIA bare-metal machines.
- The right permissions for NKS.
- The Nscale CLI v5.0.0 or later, logged in with
nscale login, and kubectl installed on your computer.
Summary
Getting a cluster running takes four steps:- Create the cluster in the console. You pick a network, a Kubernetes version, and the machines to run on.
- Wait for its status to change from Provisioning to Provisioned.
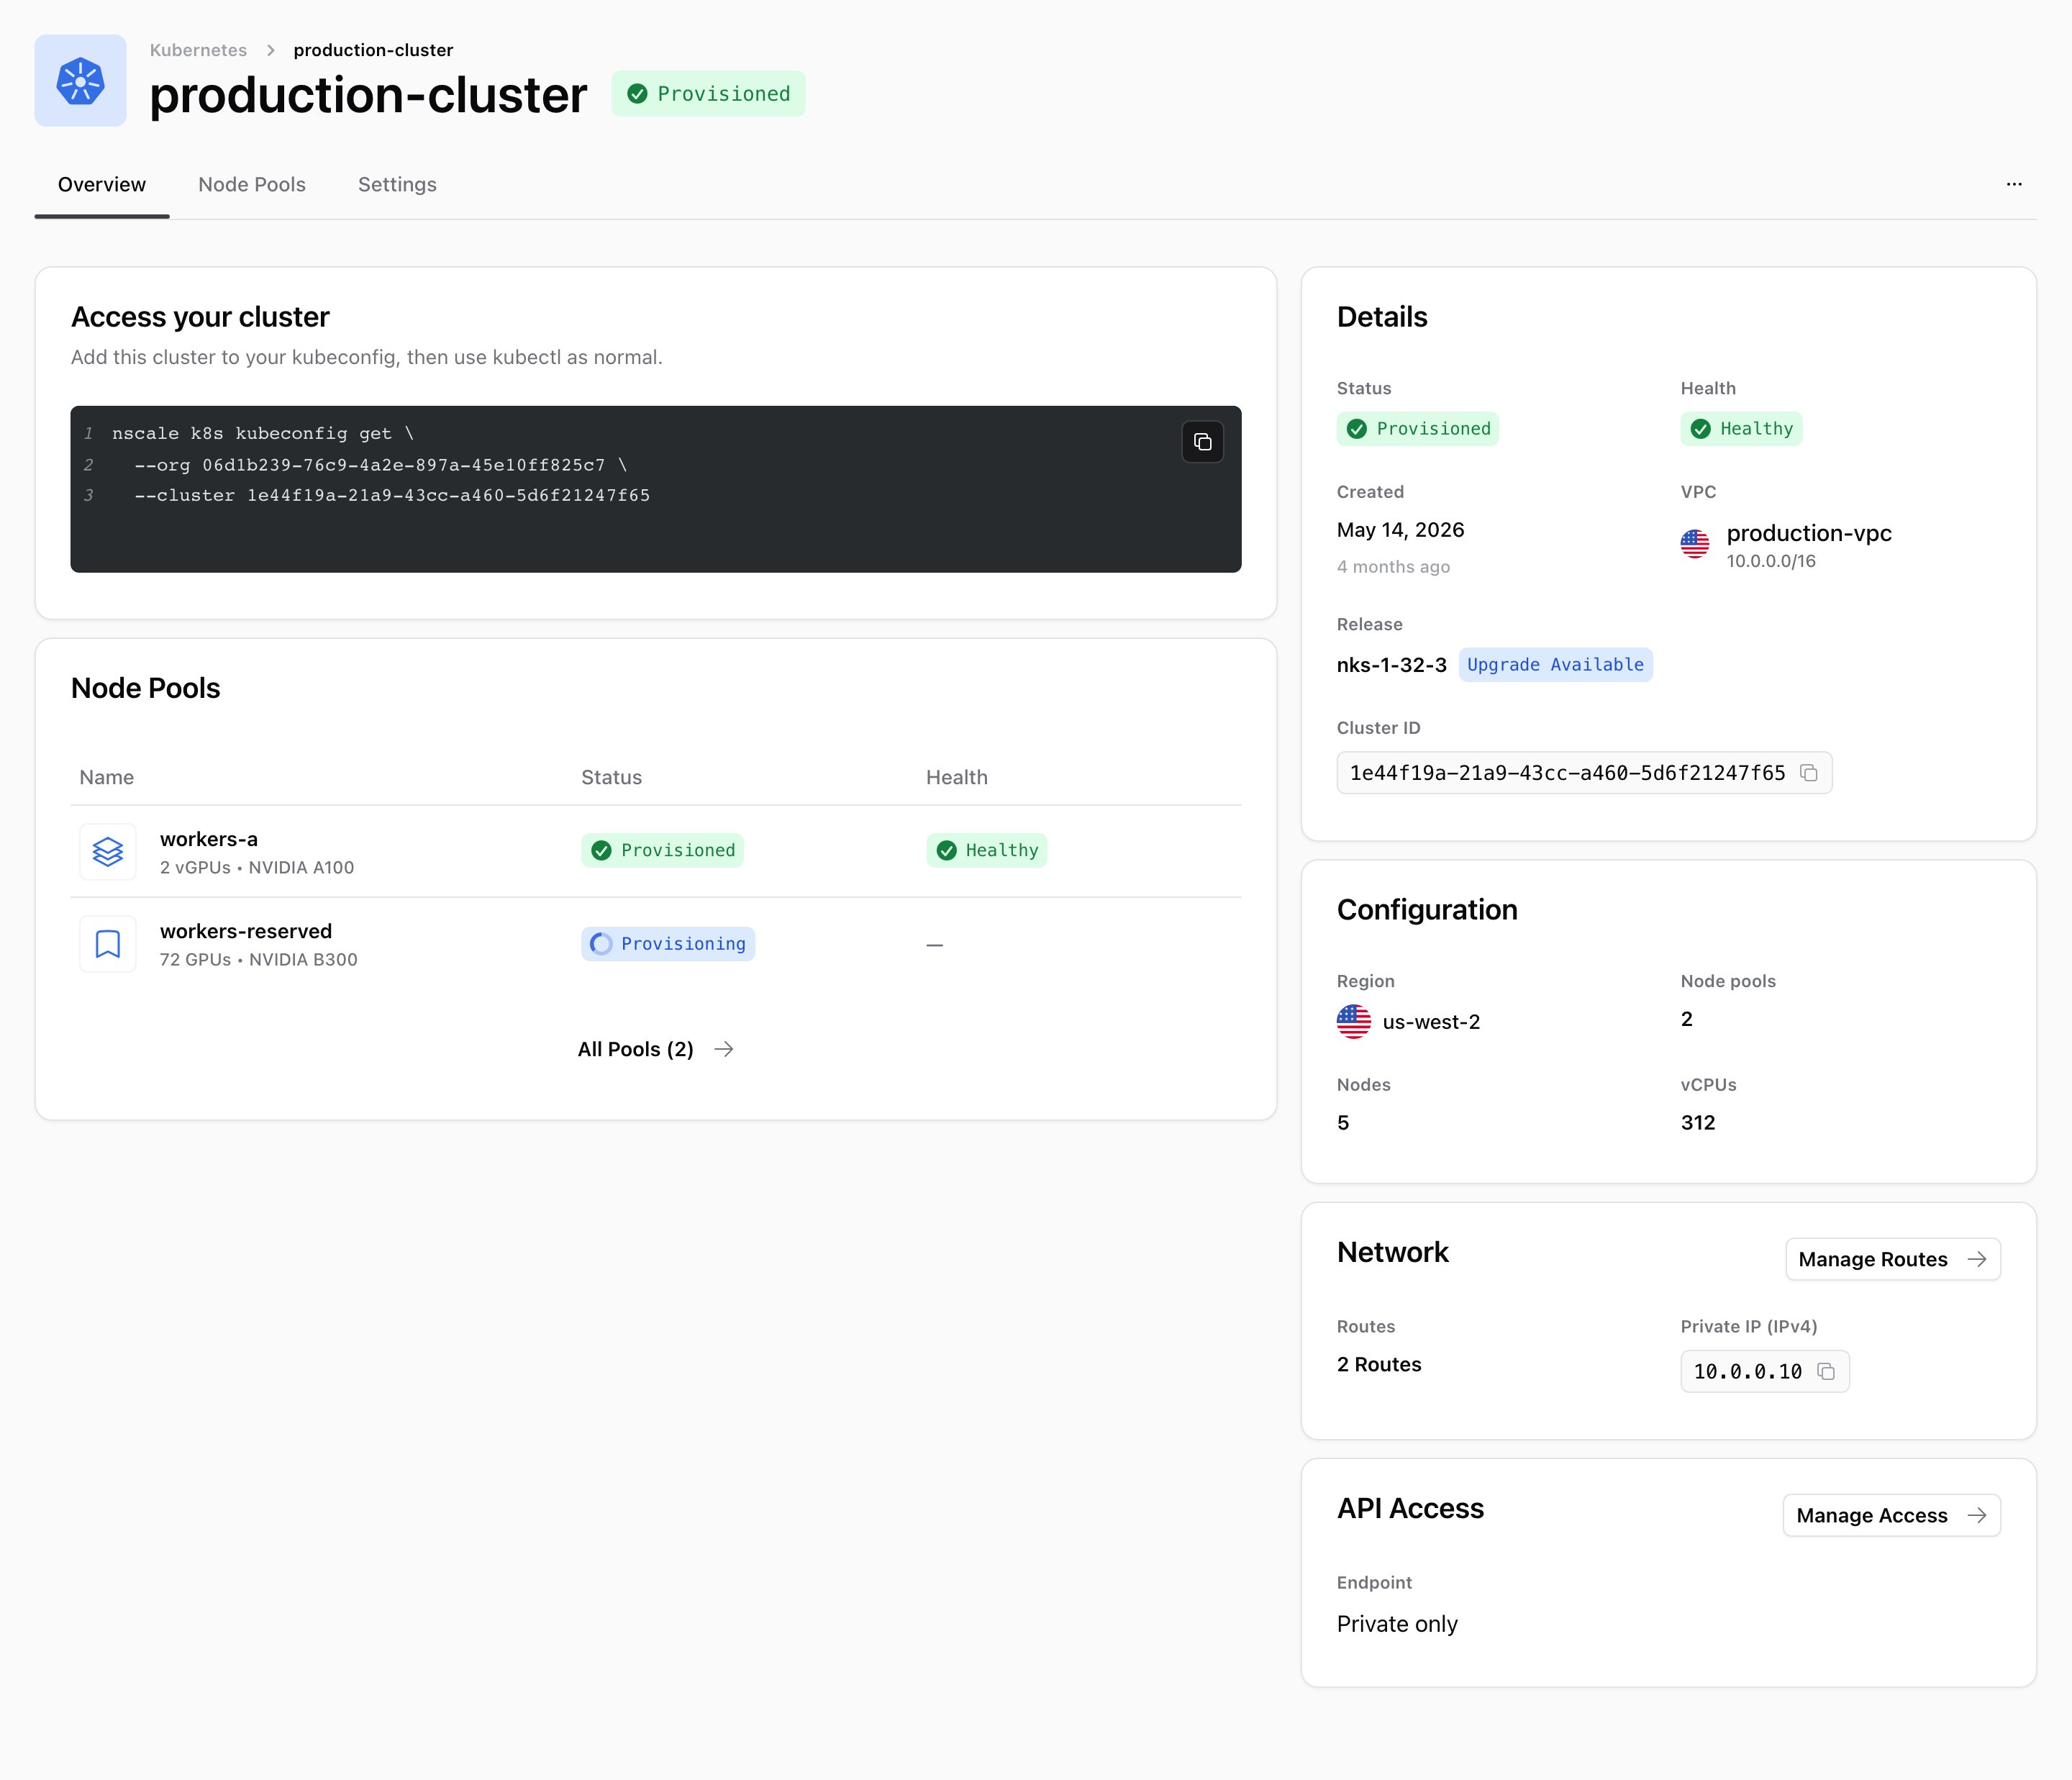
- Run the command on the cluster’s Access your cluster card to connect
kubectl. - Run
kubectl get nodesto check the connection, then deploy your workloads.
Availability
Managed Kubernetes is available to reserved cloud organizations and is enabled per organization. If you don’t see Kubernetes under Services in the console sidebar, contact your Nscale account team.Key concepts
Compute pools and reservation pools
The node type you pick decides which kind of pool you get:
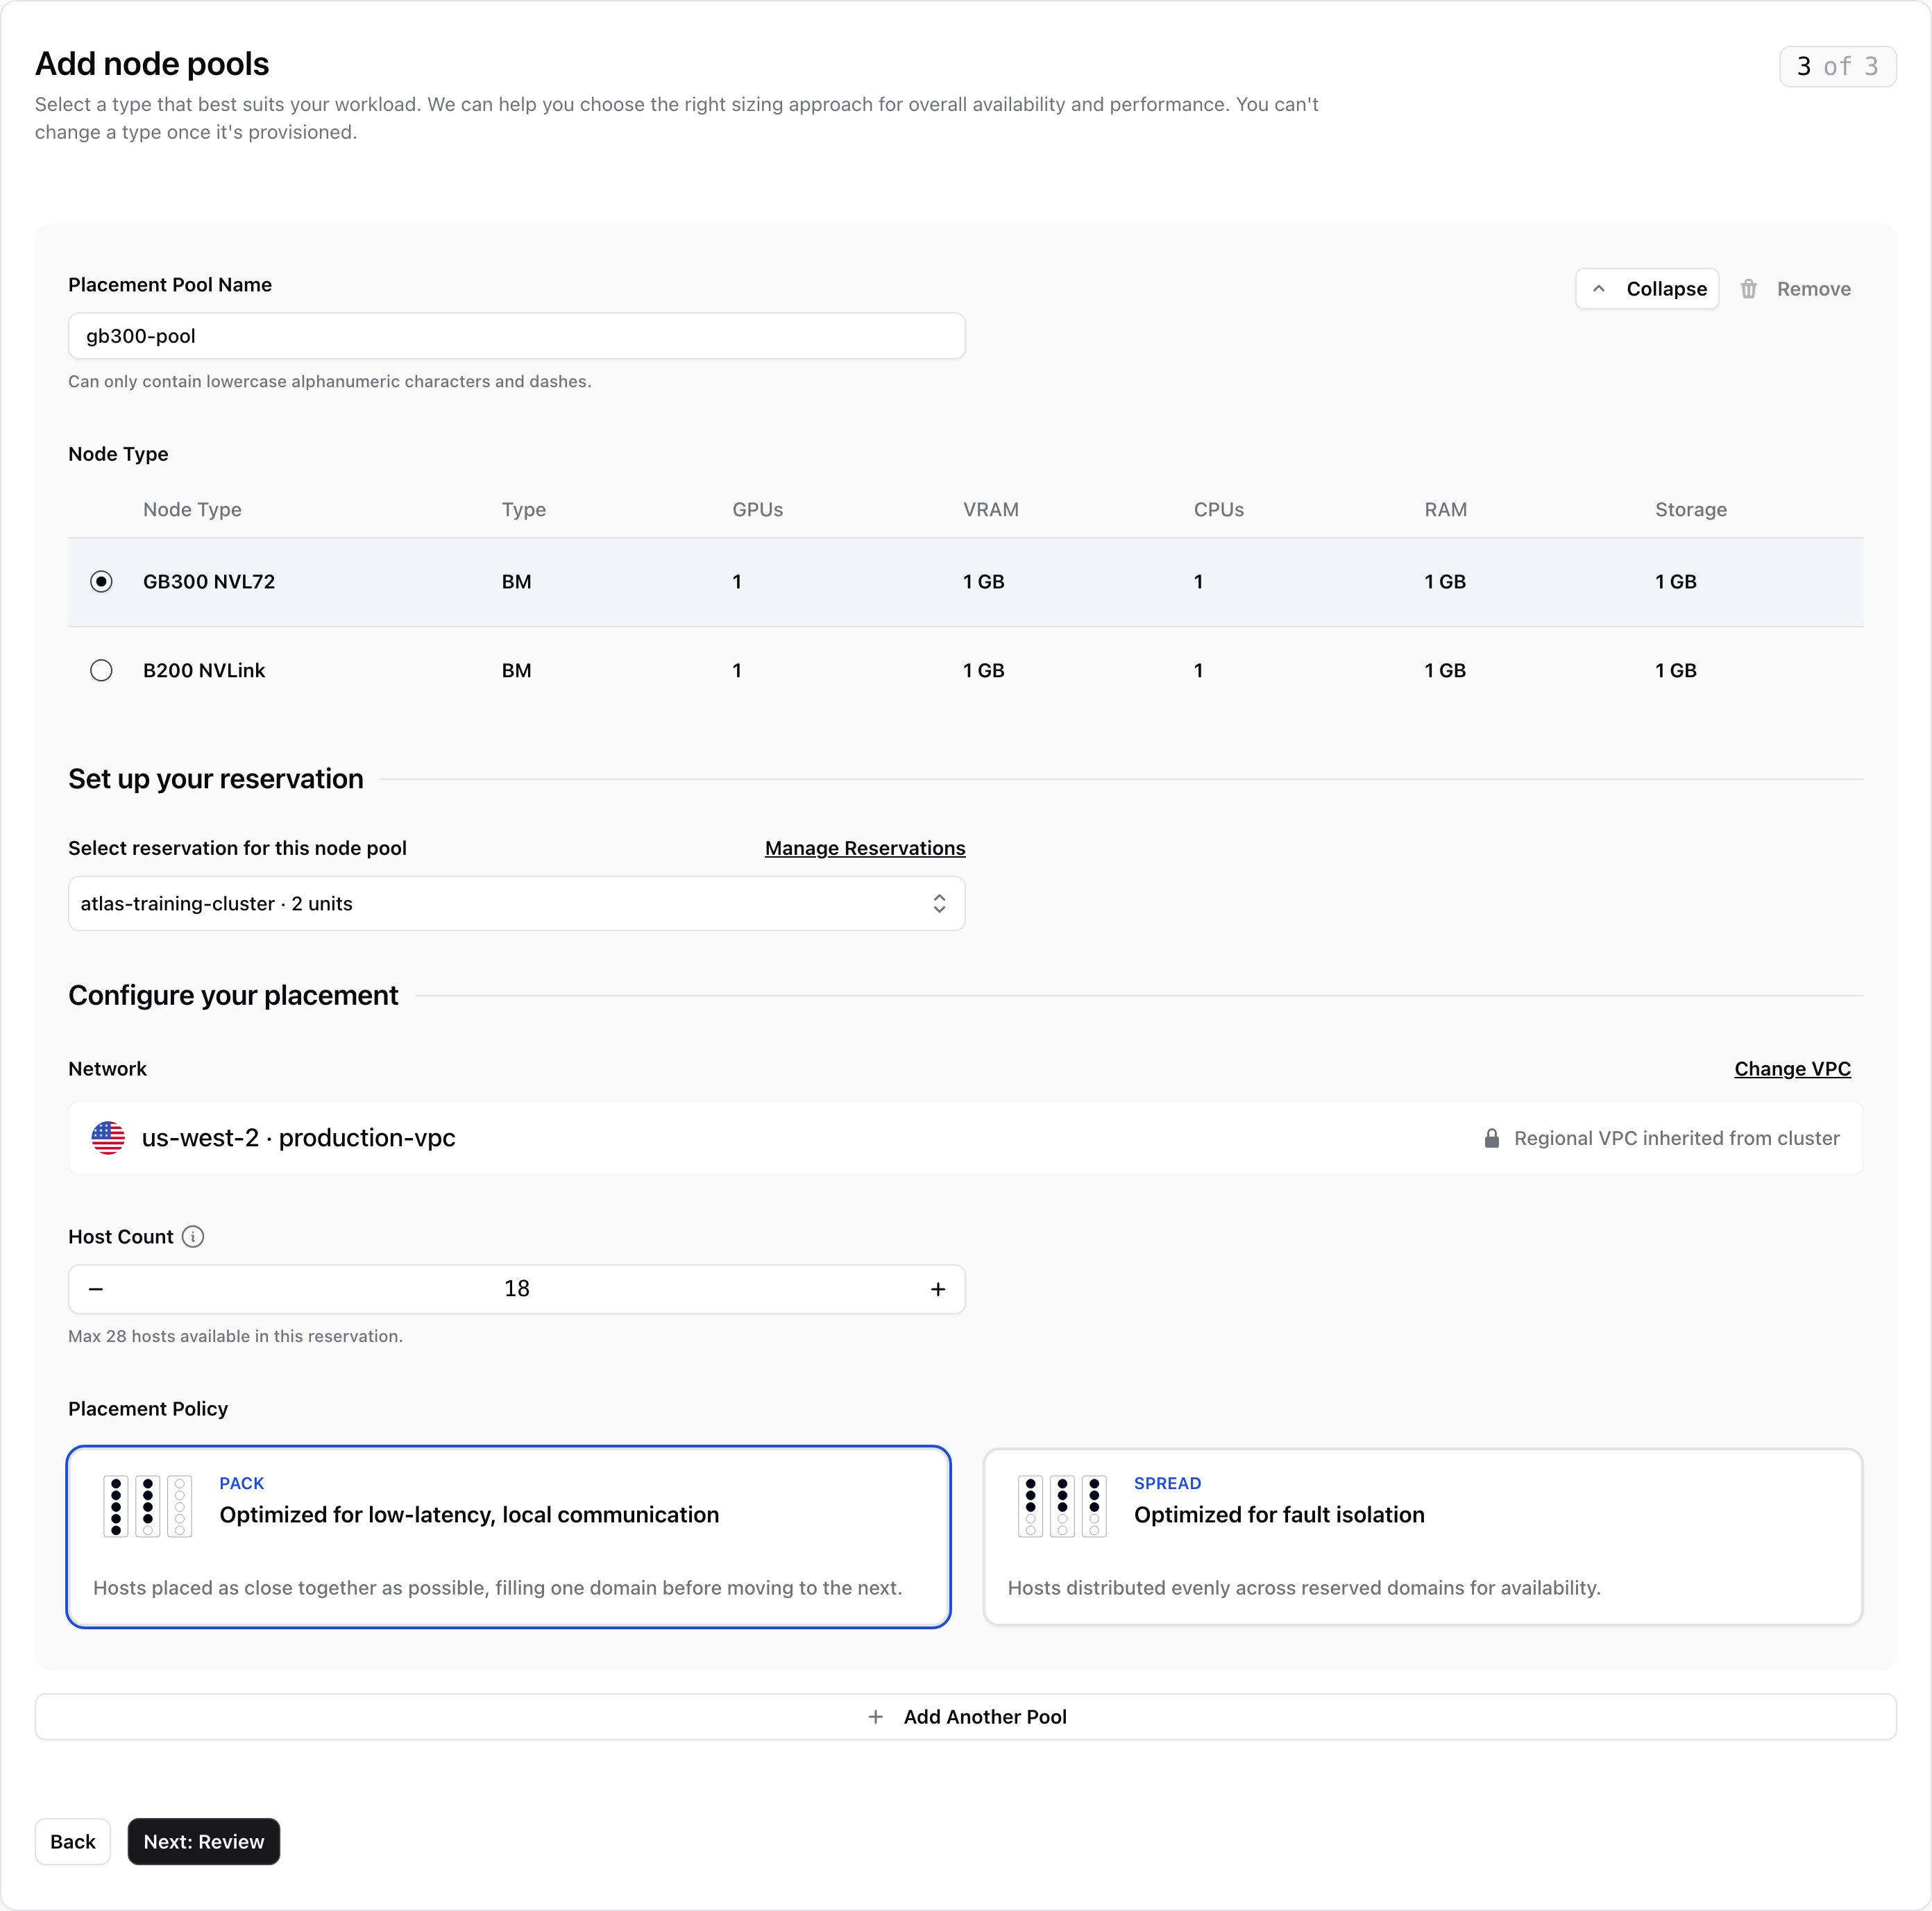
In a reservation pool, each host becomes one node. For GB300 NVL72, one host is one compute tray. The console labels a reservation pool’s name field Placement Pool Name.
Create a cluster
In your project, go to Services → Kubernetes and click Create Cluster. The create flow has four steps. Steps 2 to 4 unlock once you’ve named the cluster and picked a VPC.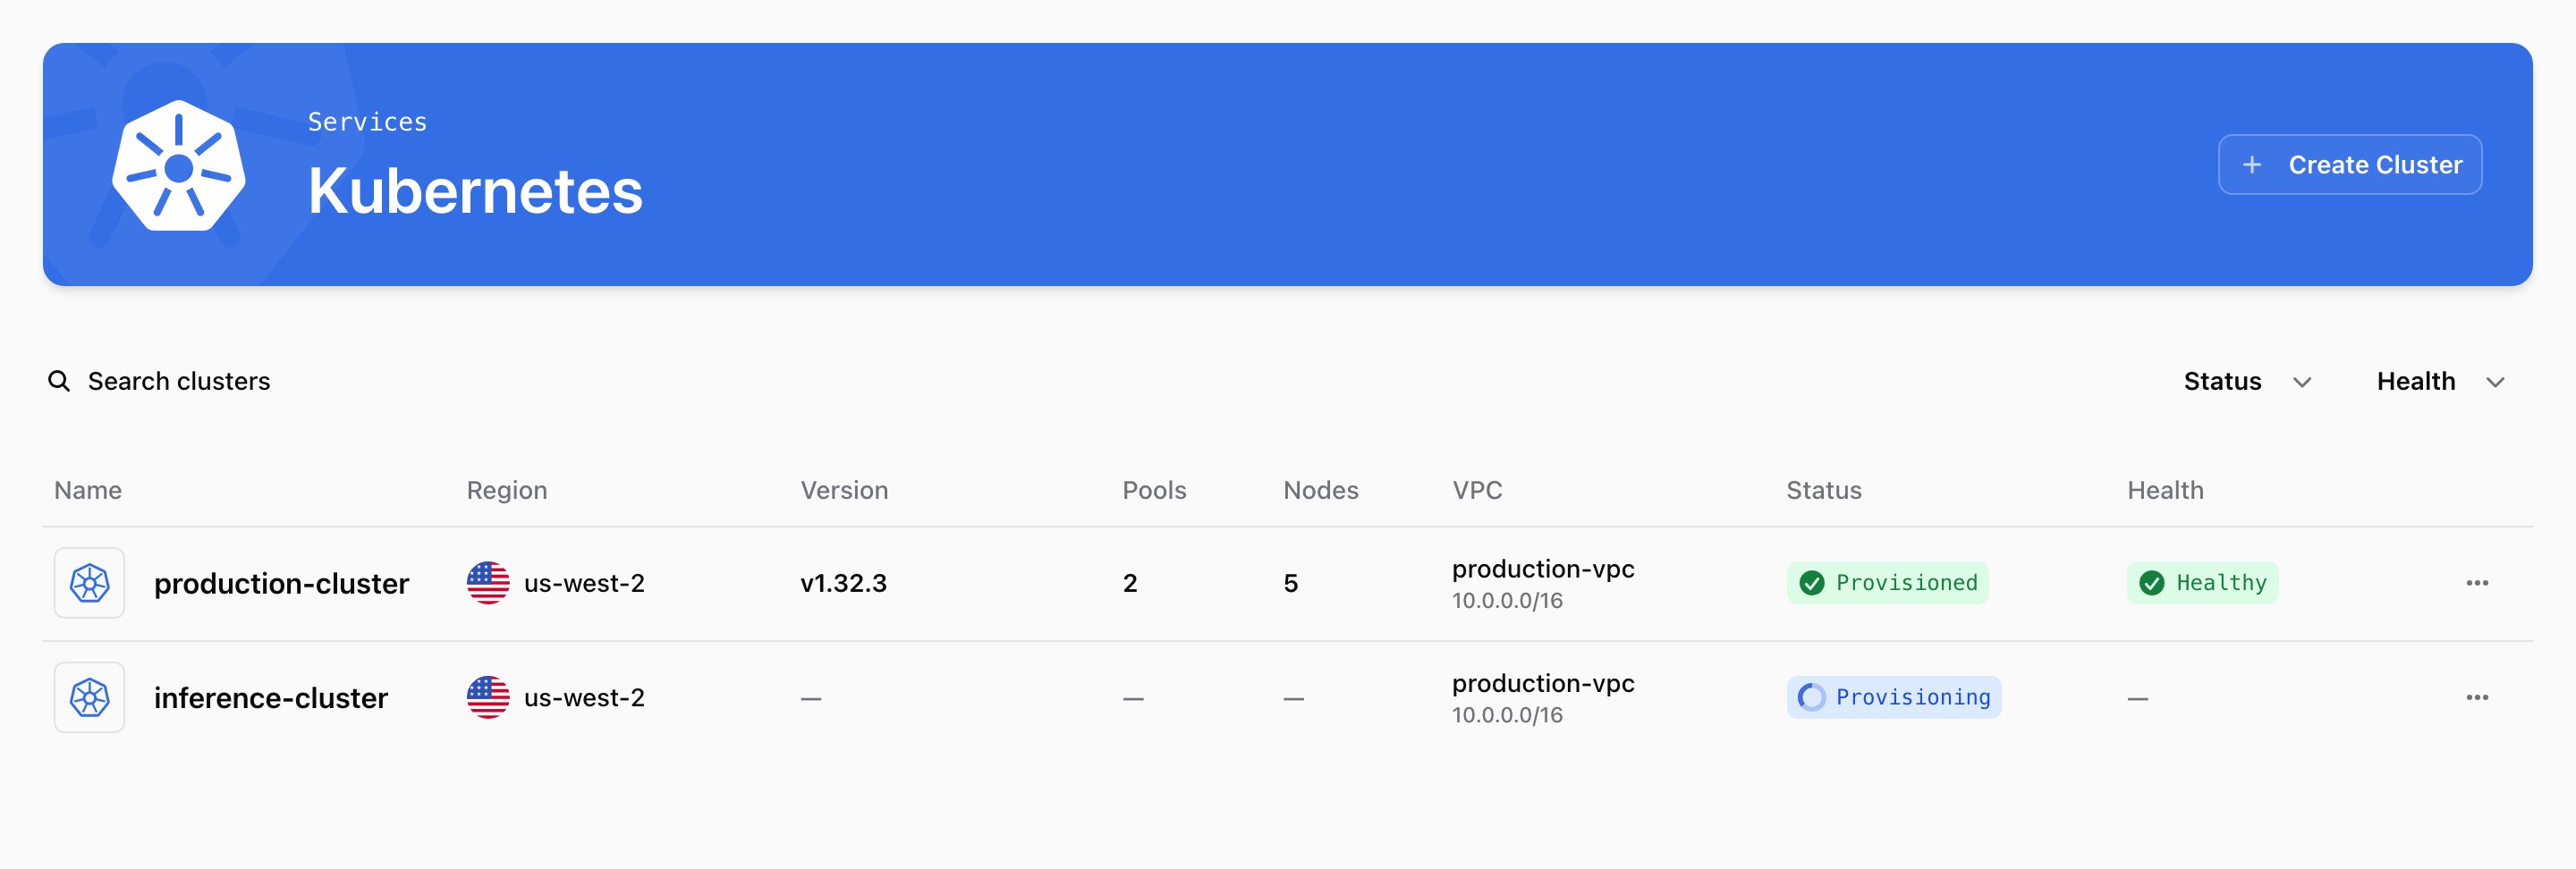
1
Set up your cluster
- Name: 3–50 lowercase letters, digits, and dashes. It must start with a letter or digit, can’t end with a dash, and can’t contain
nscale. You can’t rename a cluster later. - Choose your Regional VPC: the network the cluster joins, which also sets its region. You can’t change it later. To create a VPC without leaving the create flow, click Add new VPC.
Node labels and initial taints can’t be set in the console. Use the API or the Nscale CLI instead.
2
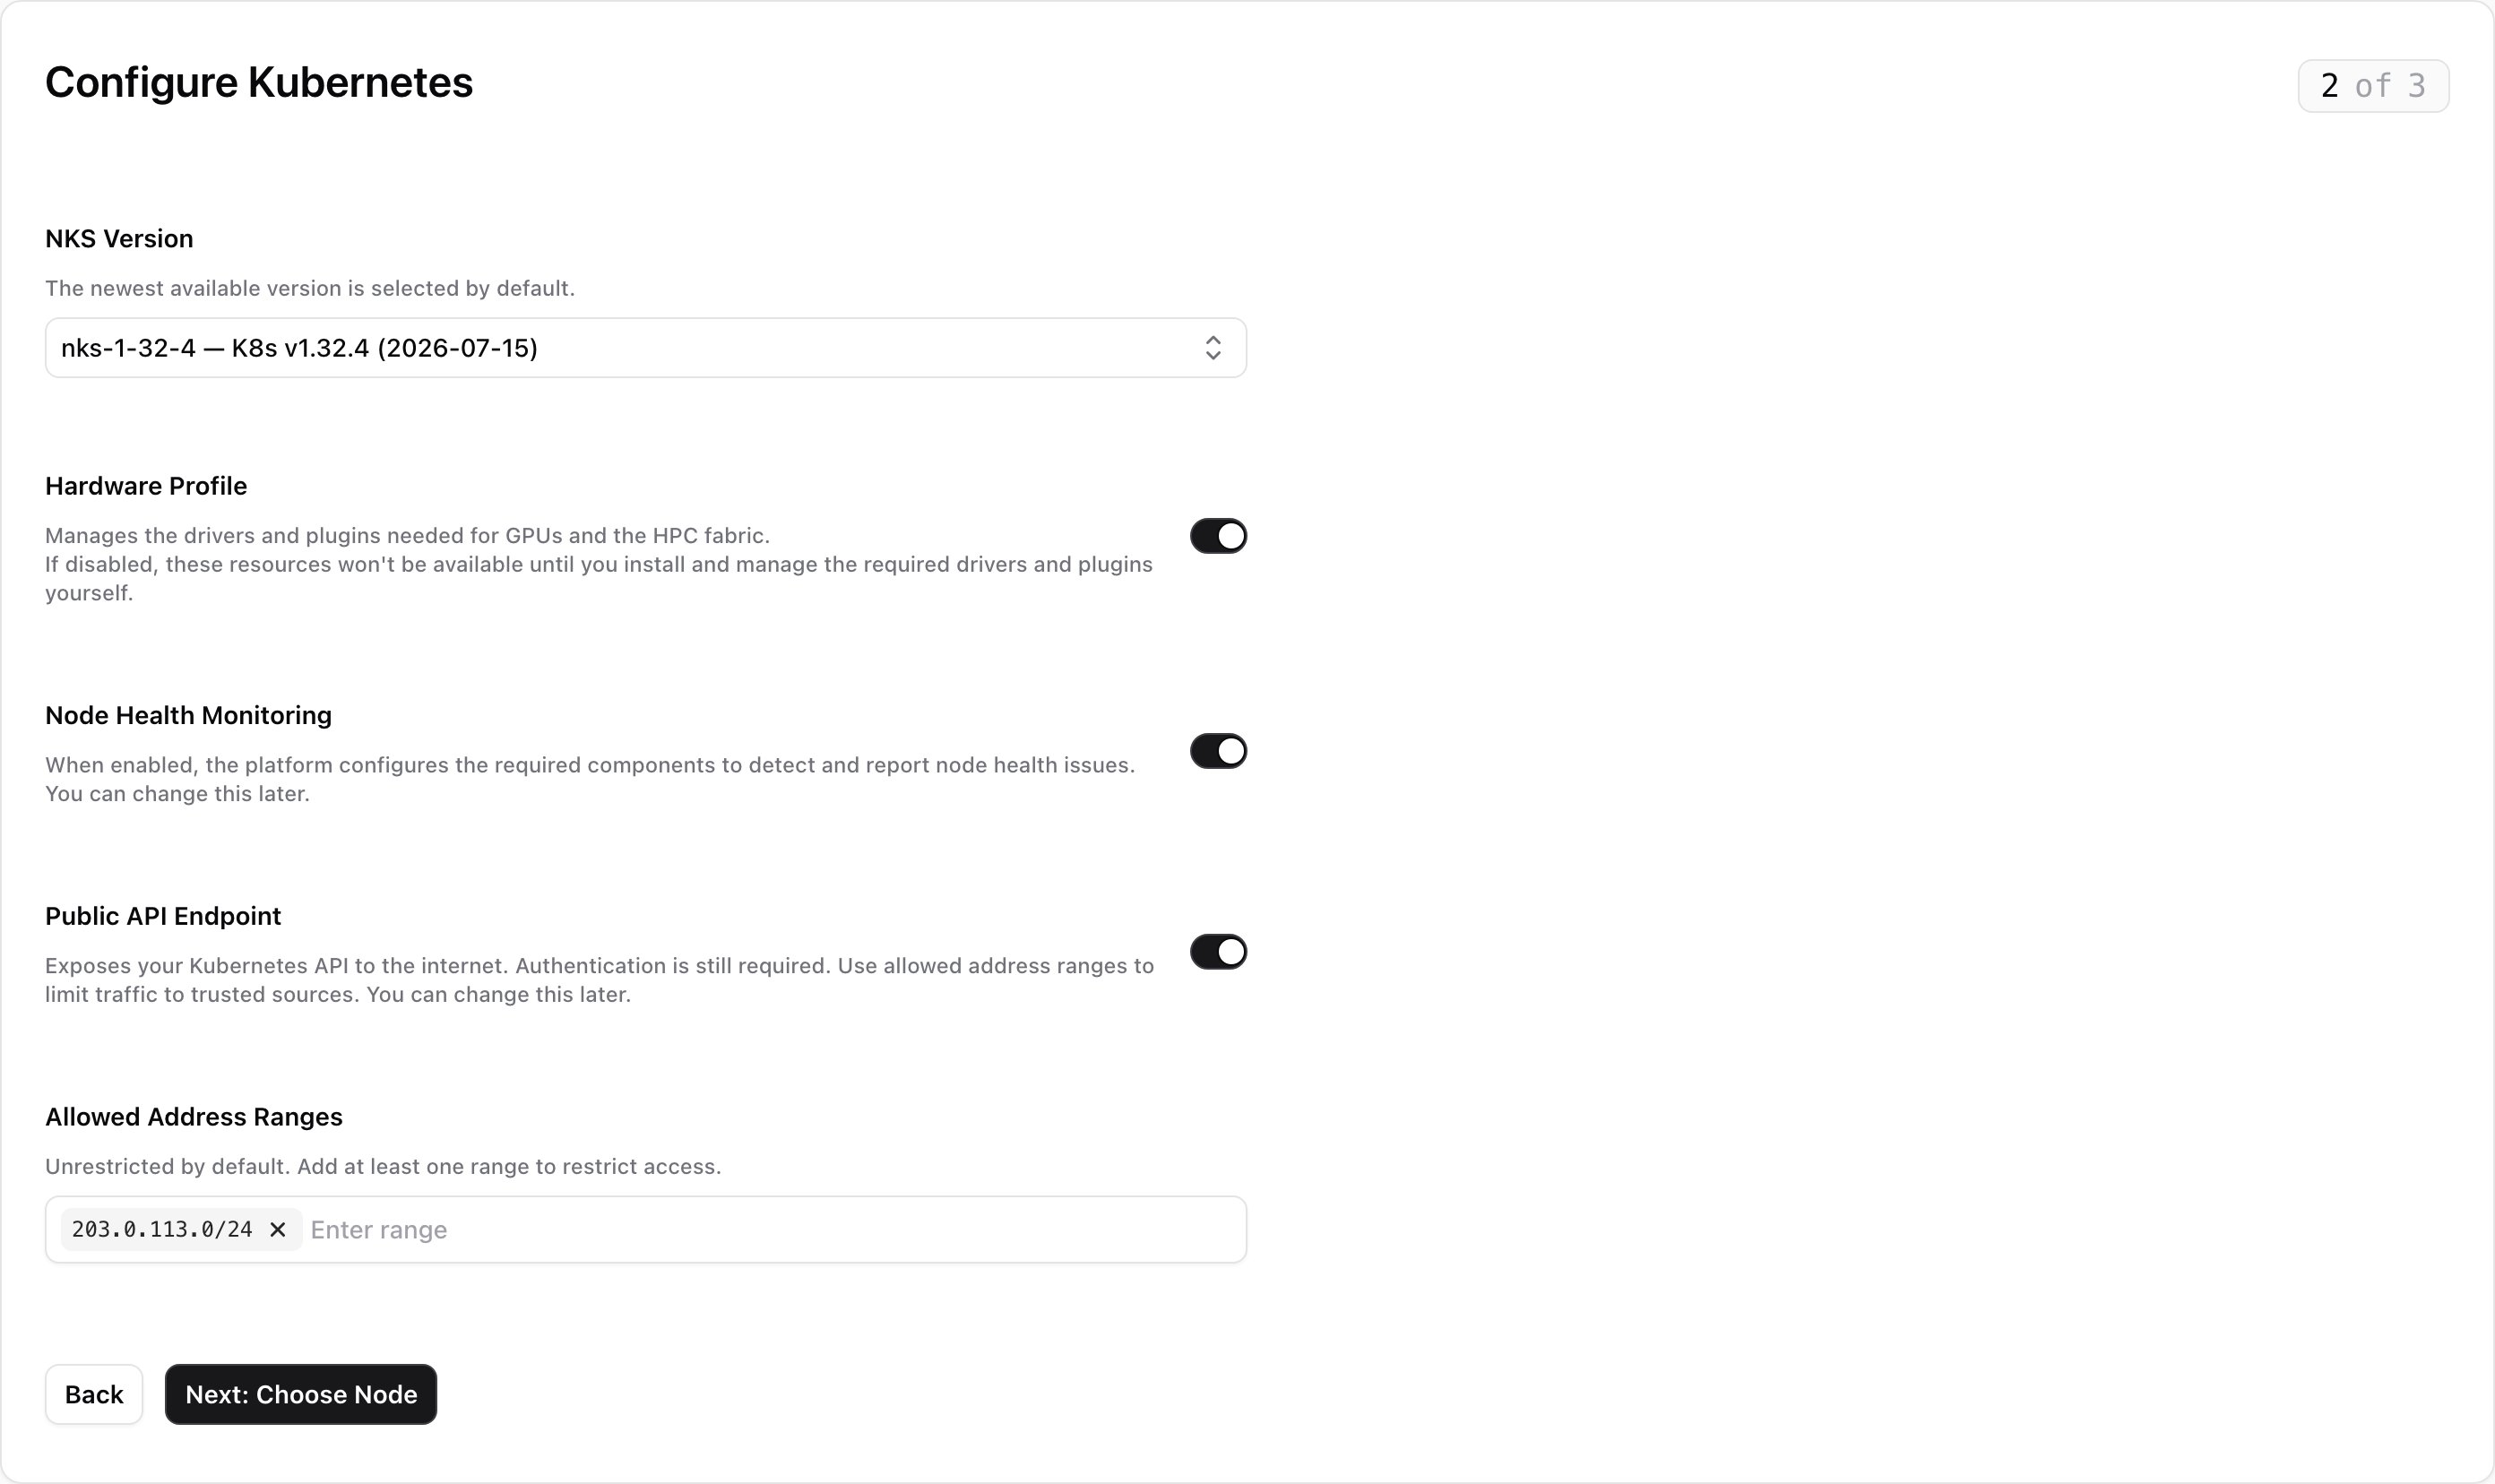
Configure Kubernetes
Nscale manages the control plane over its own network, so it never needs the public endpoint.
3
Add node pools
Name the pool and pick a node type from the table. The pool name must be unique in the cluster and follow the same rules as the cluster name. A node type is grayed out if the selected NKS version doesn’t support it.The rest of the step depends on the node type you picked:To add more pools, click Add Another Pool once the current one is complete. Only one pool is open at a time: Collapse folds it into a summary row, and Remove deletes it. A pool you haven’t changed from its defaults is ignored.
- Compute pool
- Reservation pool
Under Configure your Pool, set Number of Replicas: how many nodes the pool runs.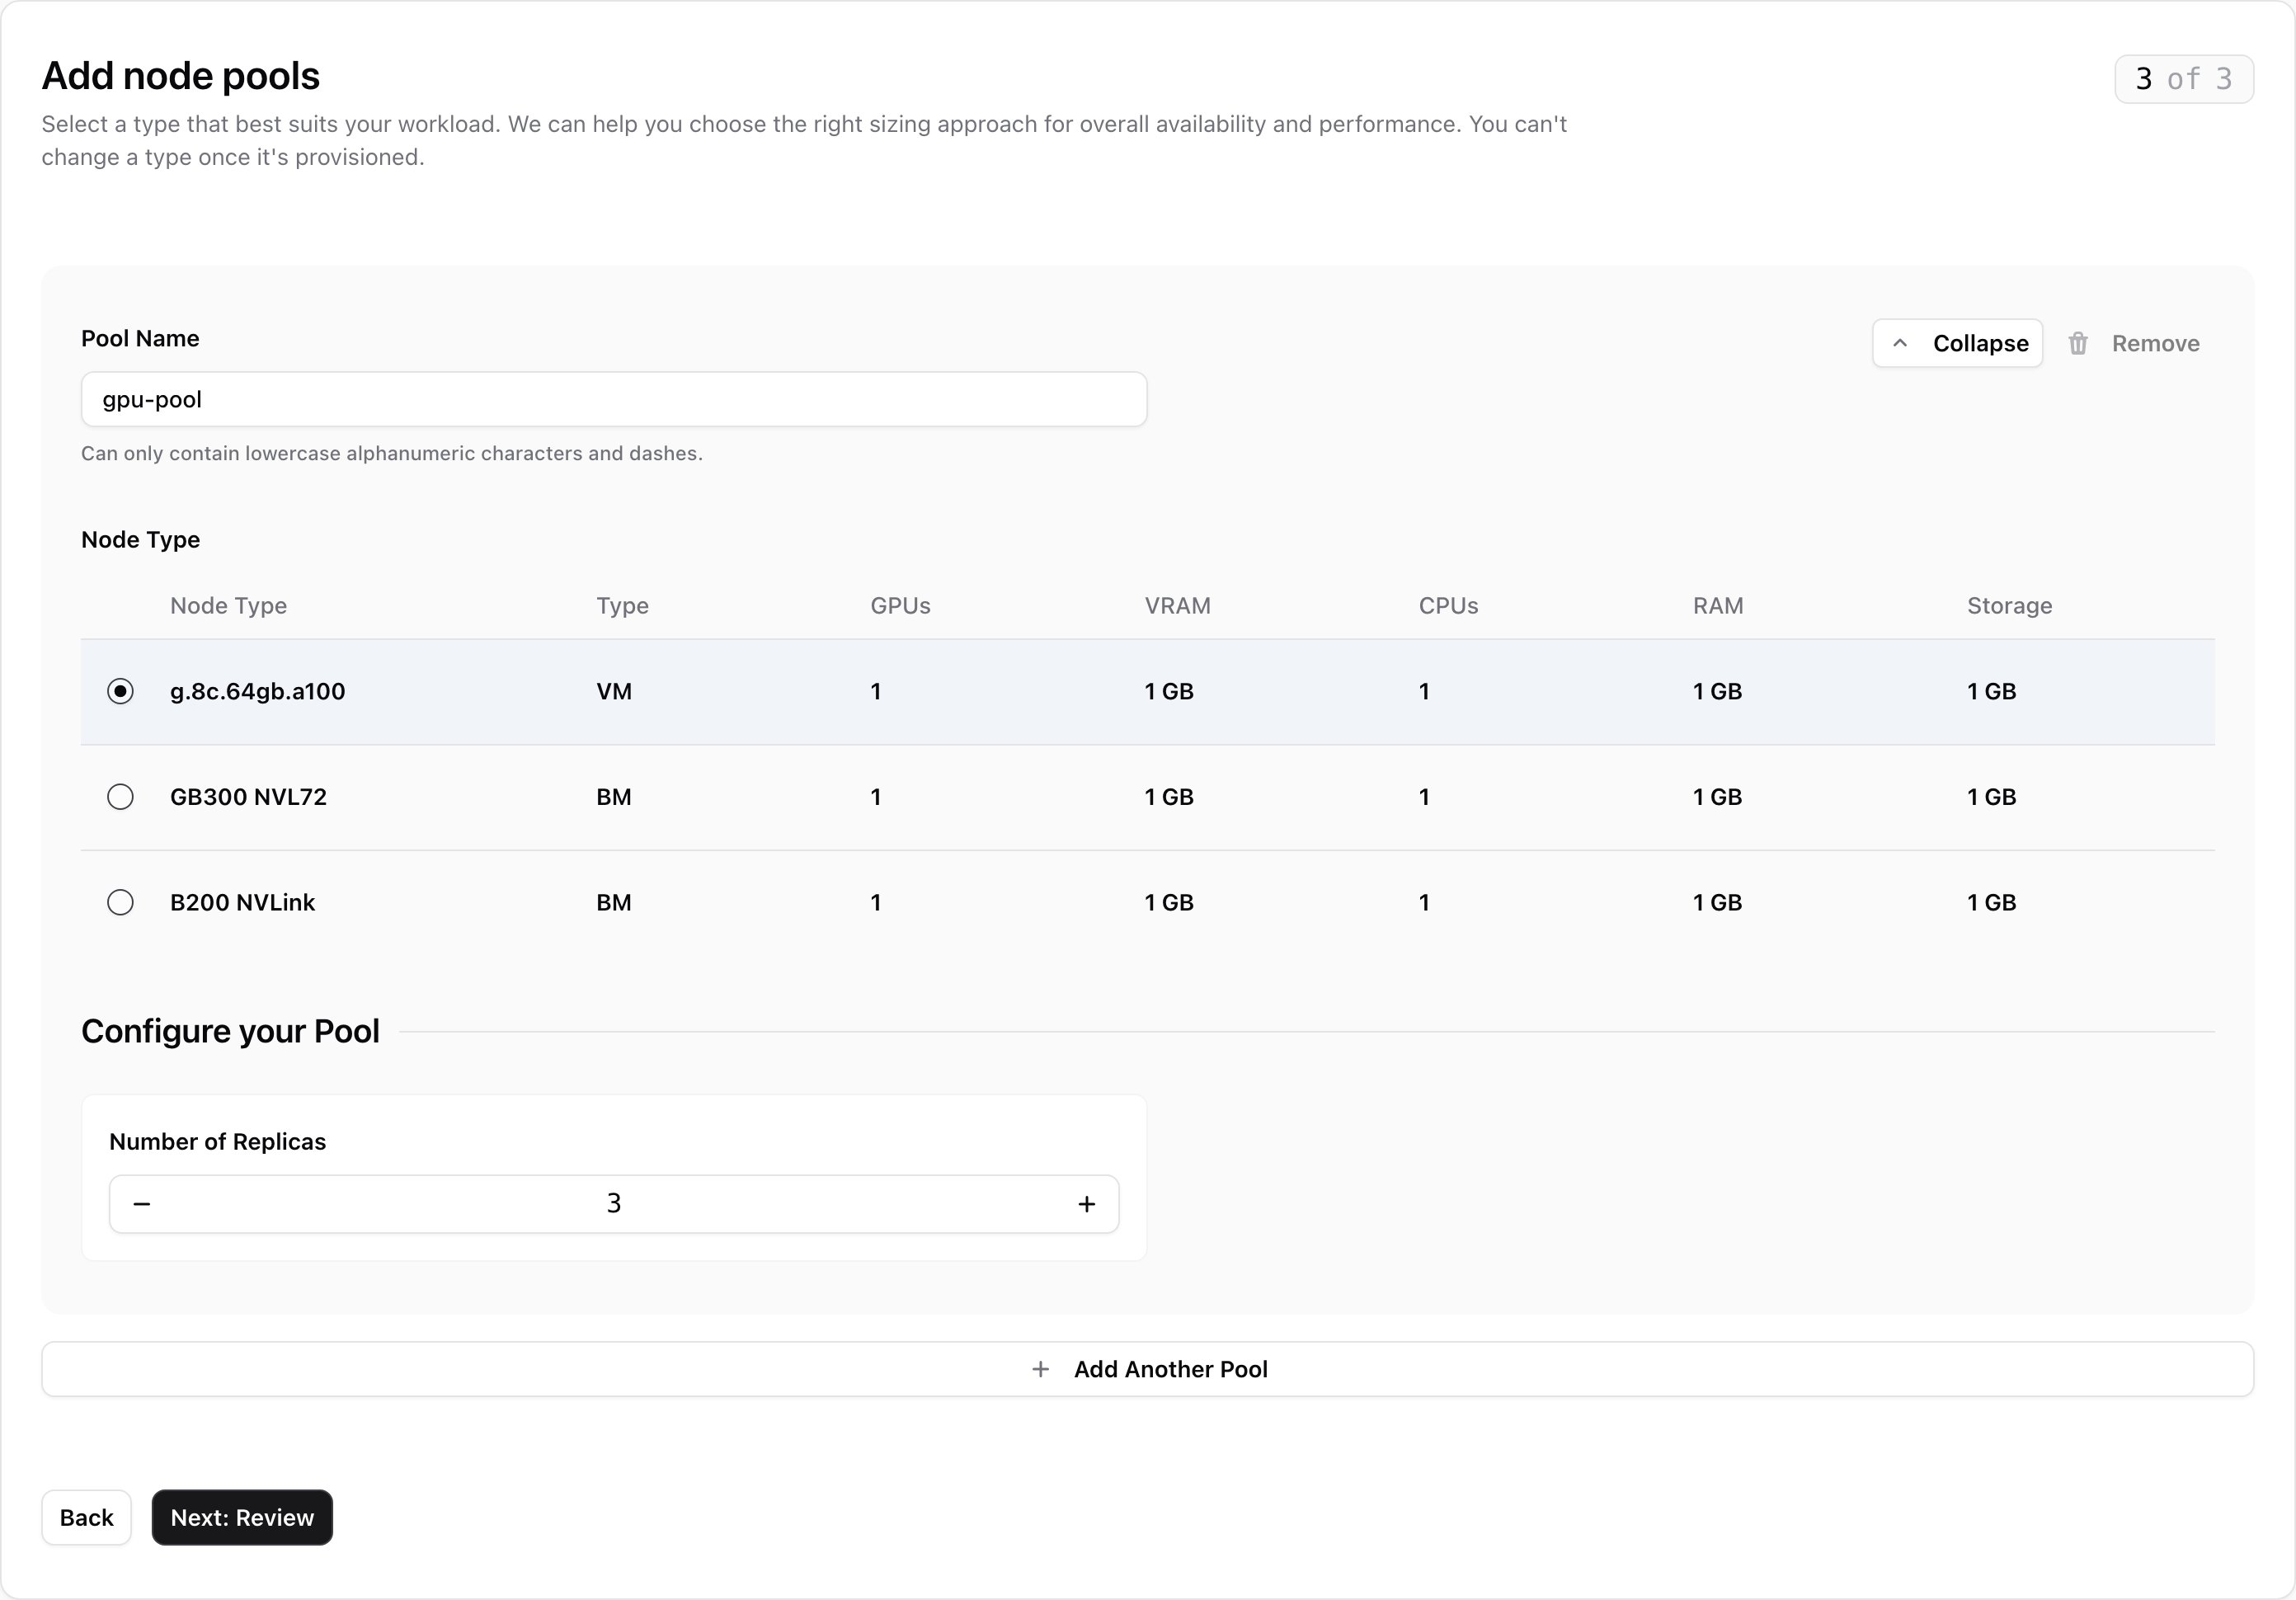
Access your cluster
When the cluster is ready, the Access your cluster card on its Overview tab shows a command that sets upkubectl. Until then, the card says the endpoint isn’t published yet.
1
Add the cluster to your kubeconfig
Copy the command from the card. On its own, it prints the kubeconfig to your terminal. Add To save it as a separate file instead, use
--merge to save it into the kubeconfig kubectl already uses ($KUBECONFIG or ~/.kube/config) and switch to it:--output (-o):2
Check the connection
kubectl needs one, it asks the Nscale CLI for a fresh token. So the file never goes stale, and sharing it doesn’t give anyone access.
What you can do in the cluster depends on your
nks:kubernetes-api permission. Read gives you read-only access (the Kubernetes view role). Update gives you full admin access (cluster-admin). Without either, the command still runs but kubectl fails, and the card tells you so.The kubeconfig uses the public endpoint if the cluster has one, and the private one otherwise. To force the private endpoint, add
--endpoint private. It only works from inside the cluster’s VPC.View a cluster
The Kubernetes page lists your project’s clusters. Click one to open it. The cluster page has three tabs, Overview, Node Pools, and Settings, and an actions menu with Copy ID, Copy as JSON, and Delete Cluster. The list’s Version column shows the Kubernetes version each cluster runs.Overview
Manage API access
To change who can reach the API, click Manage Access on the API Access card. Turn Public API Endpoint on or off, edit Allowed Address Ranges, and click Save Changes. Turning off the public endpoint also clears the ranges.Node Pools tab
This tab lists every pool with its node type, how many nodes are ready out of the number requested (Ready / Requested), and its Status and Health. The icon shows whether it’s a compute pool (stacked layers) or a reservation pool (bookmark). See Manage node pools.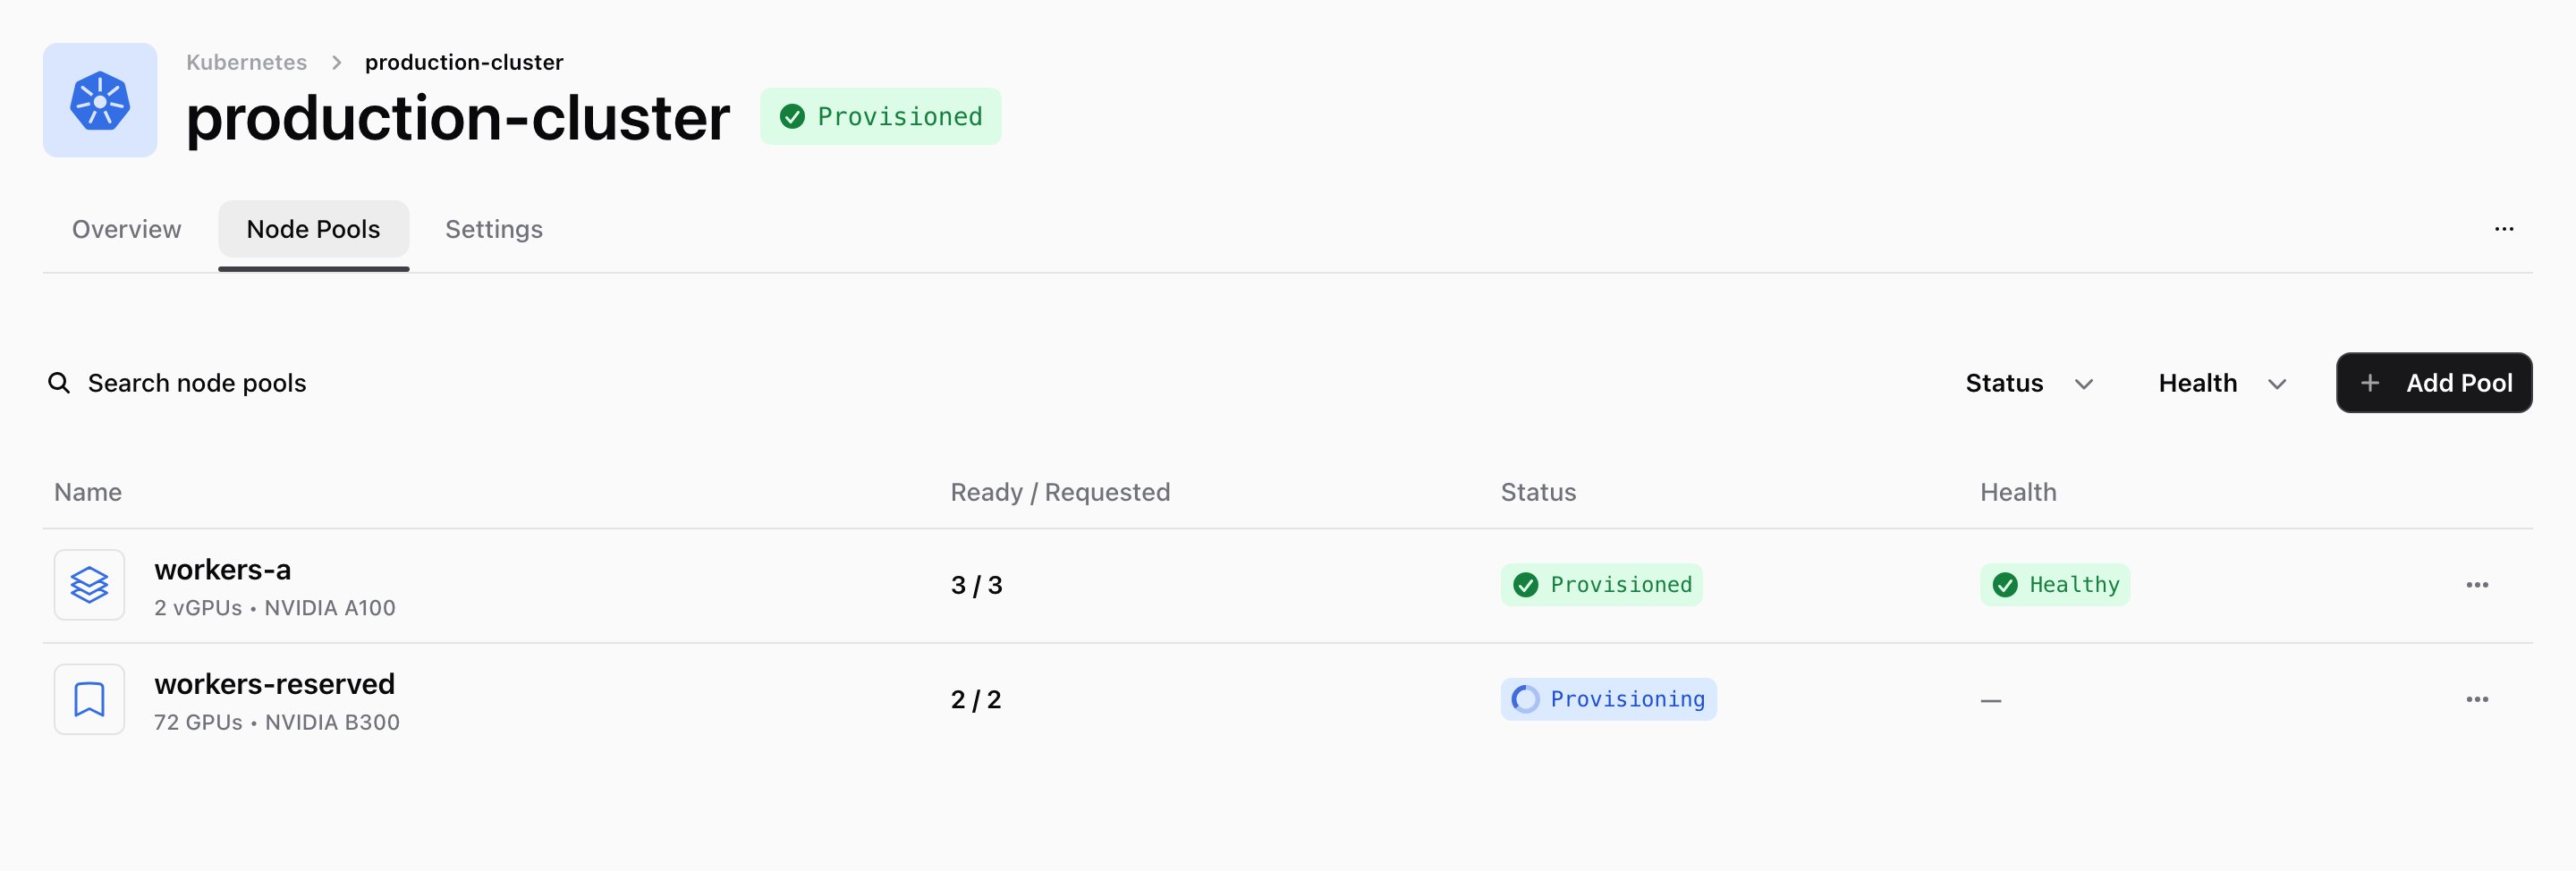
Settings tab
- Cluster info: the cluster’s name and project. Names can’t be changed.
- Cluster configuration: click Edit to upgrade the NKS version or turn Hardware Profile and Node Health Monitoring on or off, then click Save Changes. The VPC is shown but can’t be changed.
- Delete: see Delete a cluster.
Upgrade a cluster
When a newer NKS version is available, the Details card shows Upgrade Available.1
Open the cluster configuration
On the cluster’s Settings tab, click Edit on the Cluster configuration card.
2
Choose a version
Pick a version from Platform release. Only the current version and the ones you can upgrade to are listed.
3
Save
Click Save Changes to start the upgrade.
Manage node pools
Add a node pool
On the Node Pools tab, click Add Pool. The page works like step 3 of the create flow: set up one or more pools under Configure your node pools, check them under Review your node pools, and click Add Pools. Each new pool needs a name the cluster doesn’t already use, and runs the cluster’s current NKS version.Edit a node pool
You can only change the size of a compute pool. From its row menu, choose Edit Pool, change Number of Replicas, and click Update Pool. Its name and node type stay the same. A reservation pool can’t be changed after it’s created: its host count, placement policy, taints, and labels are fixed. To change any of them, add a new pool and delete the old one.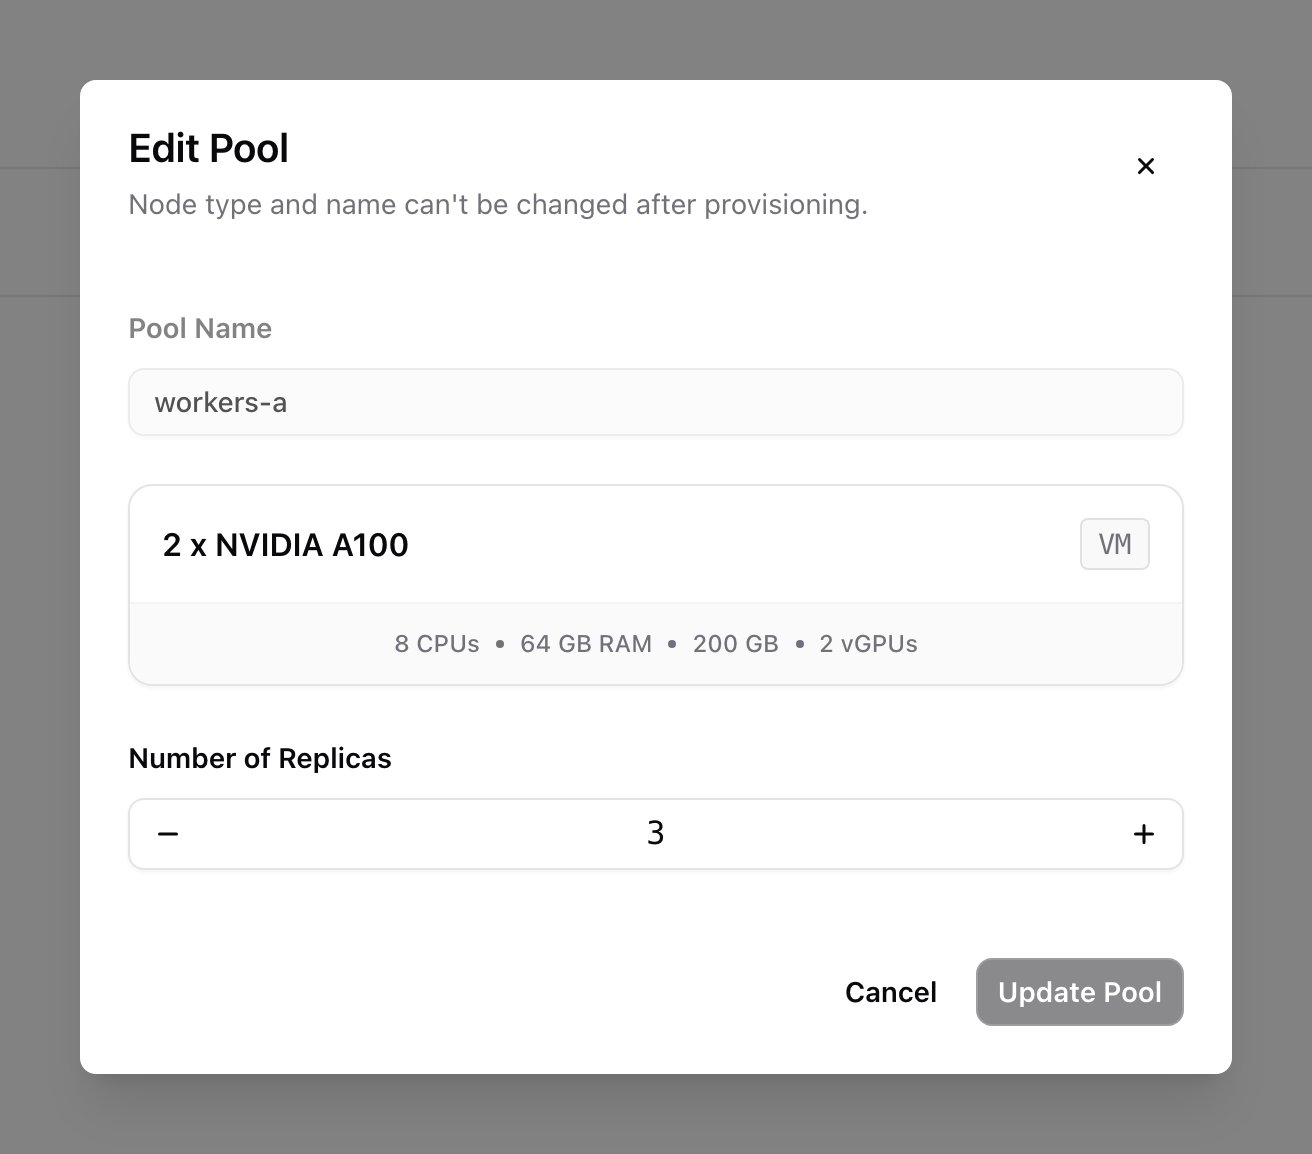
Delete a node pool
From the pool’s row menu, choose Delete Pool and type its name to confirm. Its nodes are drained and removed, and your workloads move to the cluster’s other pools.View a node pool
Click a pool to open it. The header shows its status and health, links to its cluster (and reservation, for a reservation pool), and what each node provides. For a reservation pool, it also shows the placement policy and host count.- Compute pool: the Nodes table lists each node with its private IP and Power Status. Use Stop or Start in the row, or Reboot Node from the row menu.
- Reservation pool: the table lists the servers of the pool’s placement, once NKS has taken its hosts from the reservation. Use Stop in the row, or Reboot Server (hard reboot) or Soft Reboot Server from the row menu. A stopped server shows Reboot to turn it back on.
You can’t delete a single node or server. NKS manages them and would replace it. To make a compute pool smaller, edit its size.
Delete a cluster
1
Open the delete action
Choose Delete Cluster from the cluster’s row menu on the Kubernetes page, or from the actions menu or Settings tab on the cluster’s page.
2
Confirm
Type the cluster’s name to confirm.
Cluster and node pool status
The Status column shows where a cluster or node pool is in its lifecycle:
Once it’s Provisioned, the Health column shows how it’s doing. Before that, the column is empty.
Permissions
The console hides anything your role can’t do. These are the permissions (scopes) each task needs. To grant them, see Roles and groups.Quotas
Compute pools with GPU node types use your organization’s GPU quota. Reservation pools don’t, because that capacity is already reserved. To check your quota, go to Resource Usage on the Dashboard.How NKS runs your cluster
NKS runs each cluster’s control plane on its own machines, separate from your node pools: the API server, the scheduler, the controllers, and etcd, the database that stores the cluster’s state. Nscale sets them up, keeps them running, and replaces them when needed.- Always available. The control plane runs as three copies on separate machines, so the cluster keeps working if one fails.
- Careful maintenance. When NKS replaces a machine, it starts the new one and waits for it to be healthy before removing the old one.
- Your workloads keep running. If the control plane is briefly unavailable, you can’t deploy or change things, but workloads already running on healthy nodes keep going. Applications that call the Kubernetes API all the time can still notice.
- Certificates. Nscale renews the control plane’s certificates without changing the cluster’s certificate authority (CA), so your clients keep trusting the cluster. Replacing the cluster CA isn’t supported.
- Secrets. NKS doesn’t encrypt Kubernetes Secrets at rest.
Who manages what
The three control plane copies keep the cluster available. They don’t back up your data.
Advanced configuration
Use your own identity provider
By default, you sign in to the cluster with your Nscale account. You can also let people sign in with your own OpenID Connect (OIDC) provider, and give them one of the built-in roles:cluster-admin, admin, edit, or view. Nscale never sees or stores their tokens.
You can only set this up when you create the cluster, and only through the API or CLI, not the console. Add it to the cluster’s spec.apiServer in the create cluster request (POST https://nks.nks.europe-west4.nscale.com/api/v1/clusters), or in the file you pass to nscale k8s cluster create --file cluster.json:
Keep in mind:
- It can’t be changed later. To change the provider or role bindings, create a new cluster. Pick an issuer CA that will outlast the cluster.
- Add at least one role binding. People only get the access you bind. Someone with a valid token but no binding is refused everything.
- Your provider affects the cluster. The cluster fetches your provider’s signing keys over HTTPS. Short outages are fine, because the keys are cached. A long outage, or a new key the cluster can’t fetch, stops people signing in and can make the API report as not ready.
kubectl, for example with --token or a credential plugin.
Monitor the control plane
You can scrape Prometheus metrics from each API server, controller manager, and scheduler through thenks-control-plane-metrics Service in kube-system. Metrics per copy help you tell a problem with one of them apart from load on the whole cluster.
To set it up, run Prometheus as a Pod in the cluster, and let its ServiceAccount read the metrics by binding the built-in nks-metrics-component-scraper ClusterRole to it:
- Scrape from inside the cluster. Only addresses in the cluster’s subnet can reach the metrics, even over peered networks.
- Create your own binding. Don’t edit the existing
nks-metrics-component-scraperbinding. Nscale owns it and undoes changes. - Ports.
kube-apiserveron 6443,kube-controller-manageron 10257, andkube-scheduleron 10259. Each copy has its own name:<instance>.nks-control-plane-metrics.kube-system.svc.cluster.local. - Scrape by name, not by IP address. A replacement machine can reuse an old IP address. Scraping by name shows a replacement as a gap, instead of silently mixing two machines’ data. Keep only endpoints marked ready, and give new copies time to start before alerting.
- Adding up metrics. Sum
kube-apiservercounters across copies. Only one controller manager and one scheduler are active at a time, so take the maximum of their gauges, such asscheduler_pending_pods, instead of summing them. - Not available. etcd, node, and host metrics.
Forward DNS zones to your resolvers
Inside the cluster, CoreDNS answers DNS lookups for your Pods. To send lookups for your own zones, such ascorp.example.com, to your own DNS servers, create a ConfigMap named coredns-custom in kube-system. Nscale never touches it.
- Key names must end in
.server. Other keys, such as the.overridekeys some providers use, are silently ignored. - No restart needed. Changes apply within about two minutes.
- Your nodes must reach your DNS servers on port 53, over both UDP and TCP.
- Pods only. This doesn’t change DNS on the nodes themselves, or for Pods with
dnsPolicy: Default. - Leave the cluster’s own zones alone. Don’t add blocks for
cluster.local,in-addr.arpa,ip6.arpa, or the root zone (.). The first three break Service and reverse lookups. A root block stops CoreDNS from starting the next time a CoreDNS Pod restarts. - Check the logs after each change. If CoreDNS can’t read your file, it keeps using the last working one. Look for
Corefile parse failedinkubectl logs -n kube-system -l k8s-app=kube-dns, and fix it before a CoreDNS Pod restarts.
Workload credentials
Applications running in the cluster should use projected ServiceAccount tokens. Kubernetes renews them automatically, so your application needs to re-read the token file to pick up new ones.- Tokens last up to 24 hours. A request for longer is shortened to 24 hours without an error, so check the expiry you get back. Tokens from
kubectl create tokenaren’t renewed, so automation outside the cluster must request a new one before it expires. - Legacy token Secrets are empty. A
kubernetes.io/service-account-tokenSecret is never filled in. Use the TokenRequest API or projected tokens instead.
Troubleshooting
The command on the Access your cluster card isn't there yet
The command on the Access your cluster card isn't there yet
The cluster is still being set up. The card says the endpoint will be published when the control plane finishes provisioning. Wait a few minutes; the command appears as soon as it’s ready.
The NKS Version picker says NKS isn't available in the VPC's region
The NKS Version picker says NKS isn't available in the VPC's region
No NKS version is offered in that VPC’s region yet. Choose a VPC in another region, or contact support.
The create flow says NKS versions or node types aren't visible to your role
The create flow says NKS versions or node types aren't visible to your role
Your role is missing
nks:platformreleases read, or organization-wide compute:flavors read. Ask an organization owner to add the missing permission.A node type is grayed out
A node type is grayed out
The selected NKS version doesn’t support that machine’s CPU architecture. Choose another node type, or go back to Configure Kubernetes and pick a different NKS version.
There's no reservation or free capacity for a reservation pool
There's no reservation or free capacity for a reservation pool
You see Reservation required, No host capacity available, or a message that your pools ask for more hosts than the reservation has. Either there’s no provisioned reservation for that node type, its hosts are already in use, or several pools in the cluster together ask for too many.Add or expand a reservation, delete a placement to free up hosts, or lower a pool’s Host Count.
The create flow says reservations aren't visible to your role
The create flow says reservations aren't visible to your role
Your role can’t read reservations, placements, or reservation units. Ask an organization owner to add the reservation permissions, or pick an on-demand node type.
kubectl fails even though the kubeconfig command worked
kubectl fails even though the kubeconfig command worked
Your role is missing
nks:kubernetes-api access. Ask an organization owner to grant it: read for read-only access, or update for full admin.kubectl times out connecting to the cluster
kubectl times out connecting to the cluster
Either the cluster has no public endpoint and you’re outside its VPC, or your IP address isn’t in Allowed Address Ranges. Run
kubectl from inside the VPC, or change the settings with Manage Access.People can't sign in with your identity provider
People can't sign in with your identity provider
401 Unauthorized: the token was rejected. Check thatissuerURLandaudiencesmatch the token’sissandaudclaims, that the token hasn’t expired, and that the cluster can reach your provider.Forbiddenfor everything: the token is fine, but no role binding covers the user or their groups. Check that the binding includes your prefix, for exampleacme:alice.
Related resources
Reservations
Reserve bare-metal GPU capacity for reservation pools
Placements
Learn how Pack and Spread place hosts
VPC networks
Create the regional VPC a cluster attaches to
Nscale CLI
Manage clusters, node pools, and kubeconfigs from the command line
Kubernetes API reference
Manage clusters, node pools, and NKS versions through the API